Advanced Techniques - Save a Microsoft Exchange email in a data group
This workshop demonstrates step-by-step how an email from Microsoft Exchange can be mapped and saved to a data record in a portal application.1. Create connection
If you have not set up a connection to Microsoft Exchange, create one with the Connector for Microsoft Exchange to begin with. A guide to creating a connection is available here.2. Import Microsoft Exchange applications
If you have not already imported the "Exchange - E-Mail" application, please do so now. Click here if you do not know where the import packet is or you require more information.3. Modify Exchange applications
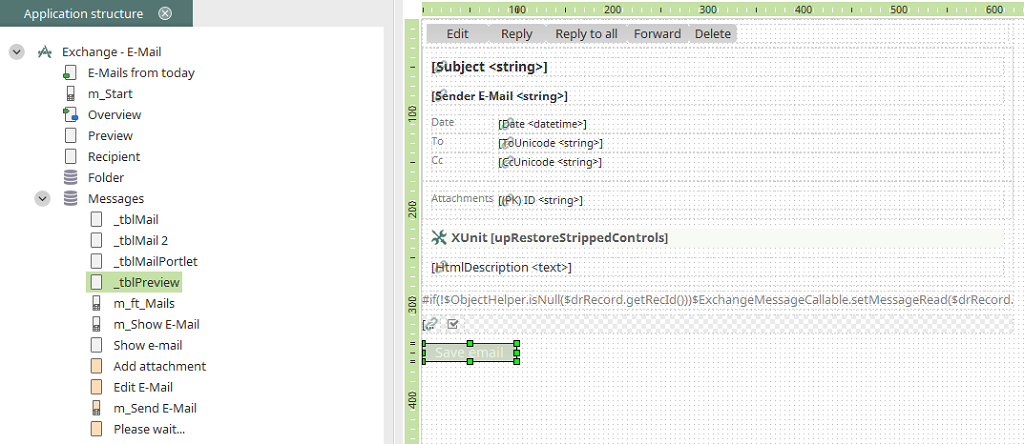
Open the "Exchange - E-Mail" application in the Applications module. Open the "_tblPreview" page in the "Messages" data group. Create a button on the page and provide it with the title "Save email".
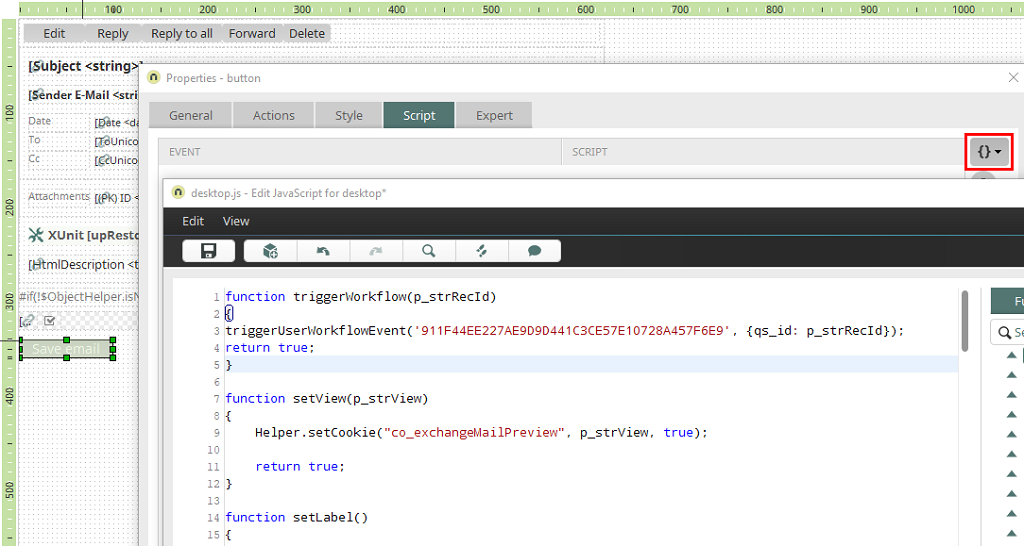
Open the properties dialog of the button and switch to the Script tab. Click on
function triggerWorkflow(p_strRecId)
{
triggerUserWorkflowEvent('911F44EE227AE9D9D441C3CE57E10728A457F6E9', {qs_id: p_strRecId});
return true;
}
On the Script tab, click on
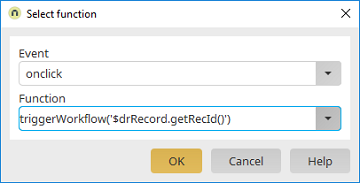
triggerWorkflow('$drRecord.getRecId()')4. Target application
The process, which we will create in the next chapter, can save the email in a data group of any existing or new application. To do this, this data group requires a data field with the "File" data type. Create such a data field in your target application. The new field can, for example, be incorporated into a table that displays data records from the respective data group.5. Create process
Switch to the Processes module and and create a new process.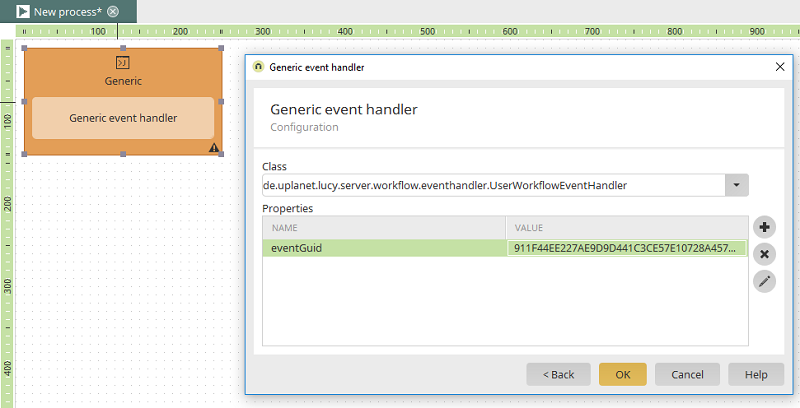
Remove any existing process elements and create a new Generic event handler. Select the class "UserWorkflowEventHandler" in the properties dialog and use the GUID, which you used in the JavaScript function "triggerWorkflow()" as the eventGuid (in our example 911F44EE227AE9D9D441C3CE57E10728A457F6E9). Confirm your entries with "OK".
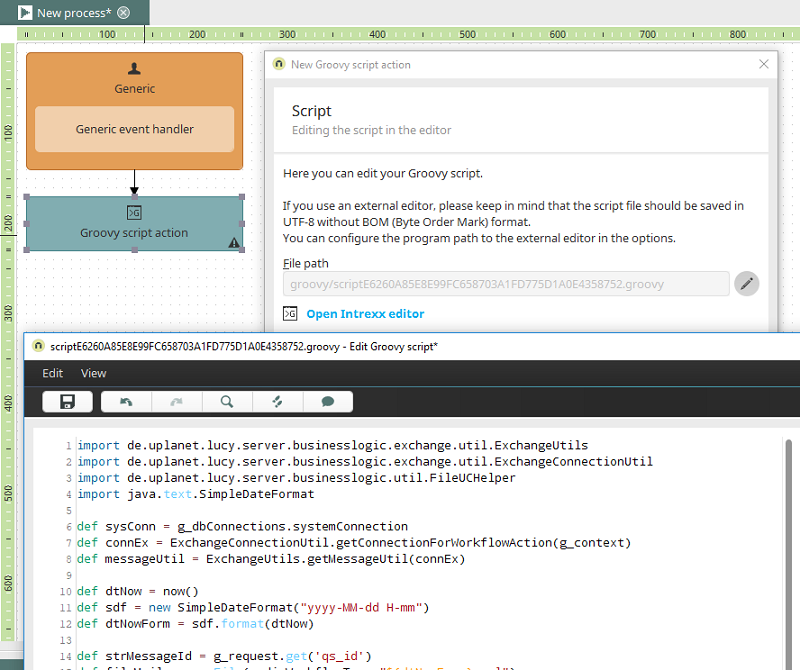
Create a Groovy script action and connect it to the Generic event handler. Insert the following script there:
import de.uplanet.lucy.server.businesslogic.exchange.util.ExchangeUtils
import de.uplanet.lucy.server.businesslogic.exchange.util.ExchangeConnectionUtil
import de.uplanet.lucy.server.businesslogic.util.FileUCHelper
import java.text.SimpleDateFormat

def sysConn = g_dbConnections.systemConnection
def connEx = ExchangeConnectionUtil.getConnectionForWorkflowAction(g_context)
def messageUtil = ExchangeUtils.getMessageUtil(connEx)

def dtNow = now()
def sdf = new SimpleDateFormat("yyyy-MM-dd H-mm")
def dtNowForm = sdf.format(dtNow)

def strMessageId = g_request.get('qs_id')
def fileMail = new File(g_dirWorkflowTmp, "${dtNowForm}.eml")


ExchangeUtils.getMessageUtil().saveMessageAsEML(strMessageId, fileMail)
//messageUtil.saveMessageAsEML(strMessageId, fileMail)

def iMaxLid = g_dbQuery.executeAndGetScalarValue(sysConn, "SELECT MAX(LID) FROM DATAGROUP('C0BA72E42EE775117DDECF63ABEA67377A521B89')", 0)
def iNewLid = iMaxLid + 1

def strSubject = g_dbQuery.executeAndGetScalarValue(connEx, "SELECT Subject FROM Message WHERE ID = ?"){
							setString(1, strMessageId)
						 }

g_dbQuery.executeUpdate(sysConn, """INSERT INTO DATAGROUP('C0BA72E42EE775117DDECF63ABEA67377A521B89')
									(LID, DTINSERT, DTEDIT, LUSERID, LUSERIDINSERT, STR_TITEL_6A585D30)
									VALUES (?, ?, ?, ?, ?, ?)""")
{
	setInt(1, iNewLid)
	setTimestamp(2, dtNow)
	setTimestamp(3, dtNow)
	setInt(4, g_session?.user?.id)
	setInt(5, g_session?.user?.id)
	setString(6, strSubject)
}

FileUCHelper.moveFileToIntrexx(g_context, fileMail,"F86BD249C2E9D9090109F3BA3B568DA683C86D05", iNewLid, "${dtNowForm}.eml", false)
In the first step, the desired email will be saved in the cache so that it can then be added to the data group. Afterwards, a new data record is generated in the data group with the SQL statement "INSERT". The email's subject is used as the title for the new entry in the target application.
| Please note that special characters in the subject of an email may cause errors during saving. |
With the help of the class "FileUCHelper" the cached email object is added to the record just created in the last step. The following parameters need to be added here:
- g_context: The current processing context. g_context can be used as a constant.
- fileMail: The file object of the cached email.
- GUID: The GUID of the file data field where the email will be stored.
- <File name>.eml: The new file name of the stored file object.
- true/false: Should a data group event handler, which is defined for the target data group, react to the addition of the file?