Intrexx Industrial - Service bus
1. Foreword
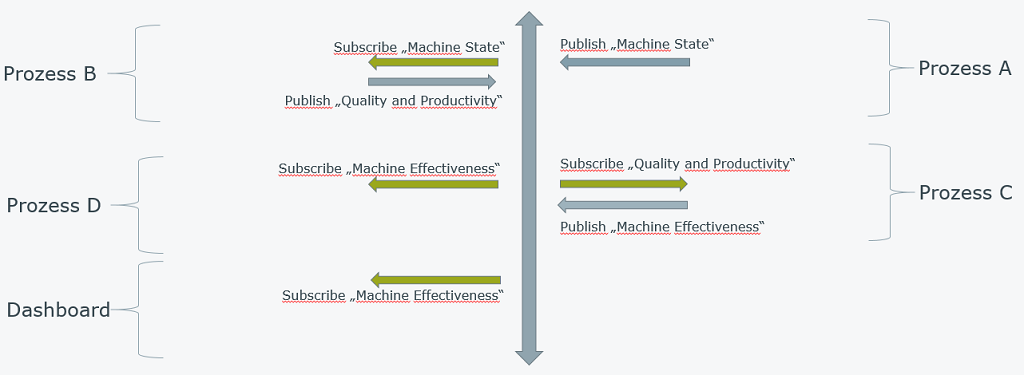
The functionality of the the Process Designer has been expanded for Intrexx Industrial. The so-called service bus has been added that is used to exchange messages between processes. These messages are portrayed via a publish-subscribe model - as is the case with JMS or MQTT. The service bus is available in Intrexx Version 18.03 with Online Update 02 or higher.What are the benefits of the service bus?
- Develop apps independent of the data source (e.g. key machine figures)
- Request values via JavaScript directly from the web client without detours through the database (e.g. visualization in dashboards)
- Many more use cases in processes
2. Send message to the service bus
In the following example, we will demonstrate a process that publishes a message on the service bus and responds to the service bus. If you want to reconstruct the example, please proceed as follows:- Import the certificate for the Test MQTT Server as described here.
- Click here to download the example application and process, and then import these as usual. Activate the process so that all functions are available.
- Messages are only generated when the global timer in the process is activated. Open the process to do this. Once you activate the timer via the Edit menu / Activate element, it will be performed based on the configured execution time. Please do not forget to deactivate the timer afterwards, otherwis a lot of values will be written to your database. Alternatively, you can start the timer manually via the Alternativ kann der Timer auch über das Edit menu / Start global timer job to test the process - this option generates an overseeable amount of messages.
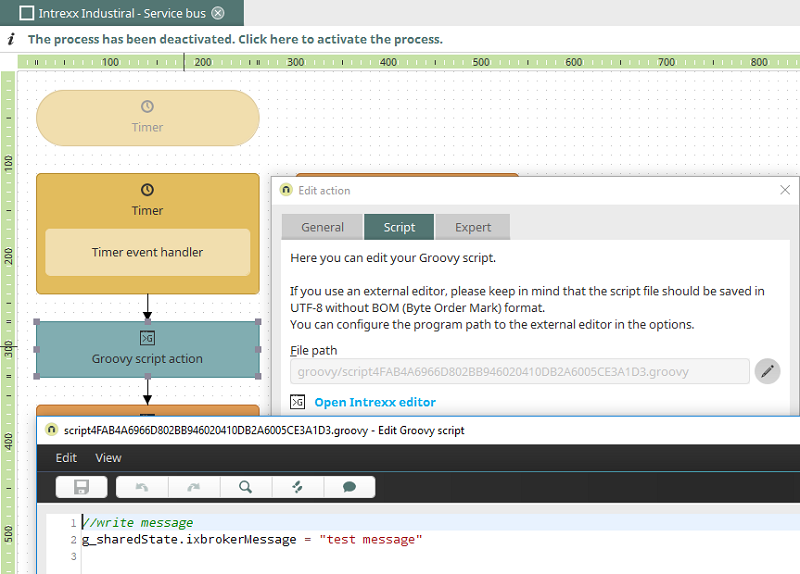
The first process chain - left in the picture - that sends the message starts with a global timer. A timer event handler is connected to this that responds to events from the global timer. The next process step is a Groovy script action with the following script:
//write message
g_sharedState.ixbrokerMessage = "test message"
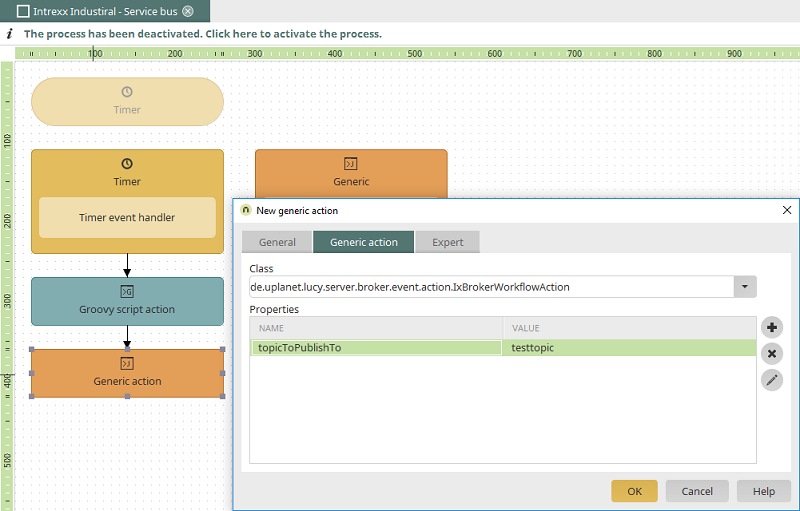
The class "de.uplanet.lucy.server.broker.event.action.IxBrokerWorkflowAction" is selected in the generic action. A value of your choice can be defined as the name of your message with the property "topicToPublishTo". In this example, the name is "testtopic".
| With the property "onlyPushOnChange" and the value "true", you can determine whether the topic should also be refreshed if the current value on the bus is different. |
3. Respond to a message from the service bus
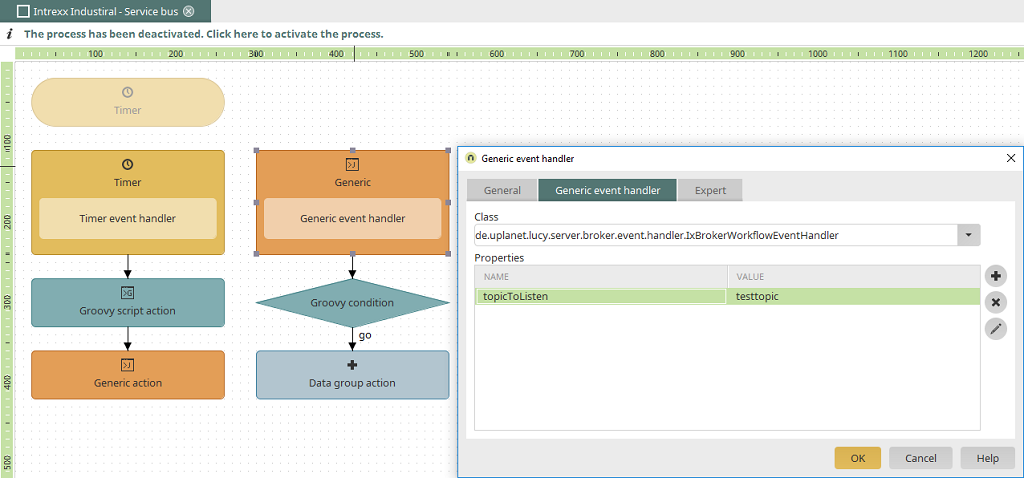
In the second part of the process, the class "de.uplanet.lucy.server.broker.event.handler" is selected in the properties of the generic event handler. The desired topic (in our example "testtopic") can be specified as the value of the property "topicToListen". This topic will then be subscribed to automatically.
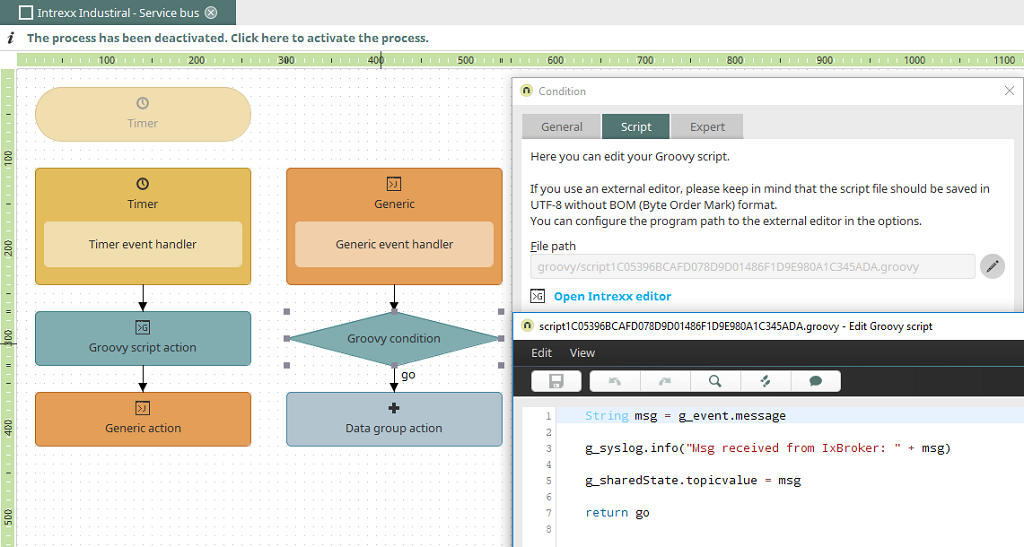
You can retrieve the value from the service bus using a Groovy script action or a Groovy condition, as in our example. This process step is triggered by the event handler as soon as a value in the service bus of the topic subscribed to is updated. The following script is then performed:
    String msg = g_event.message

    g_syslog.info("Msg received from IxBroker: " + msg)

    g_sharedState.topicvalue = msg

    return go
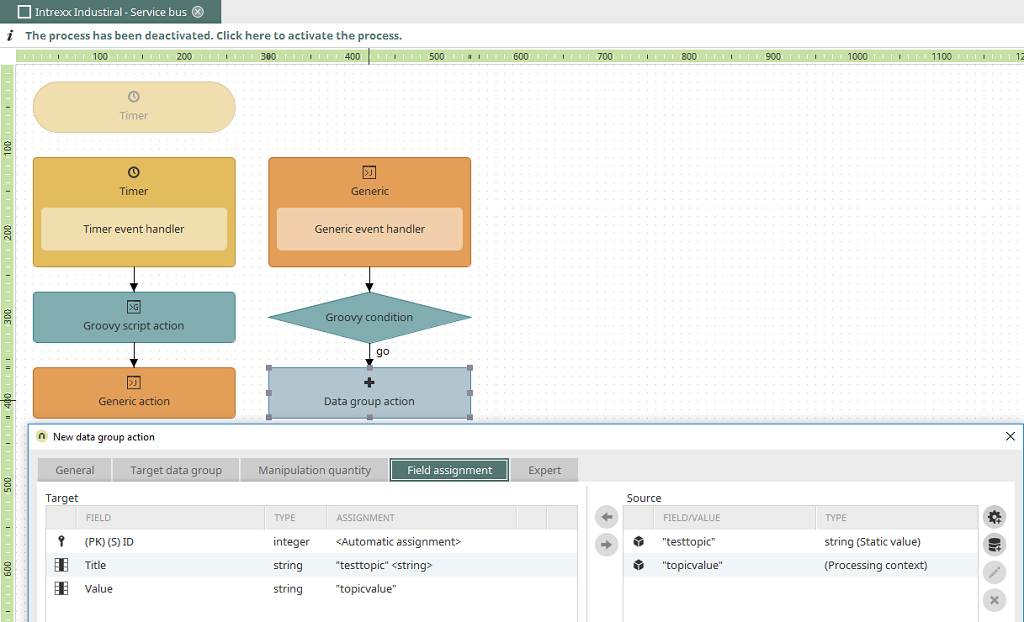
In the subsequent data group-action, two user-defined values from the processing context are assigned to the fields "Title" and "Value" from the connected application:
- Static value: Character string with the value "testtopic"
- System value: "topicvalue" value from the "Processing context"
3. Respond to a message from the service bus on the client side
Especially in IoT environments, it may be necessary to update a specific page or specifc elements of a page periodically. With the service bus, you have the ability to respond directly to changed values of a specific topic.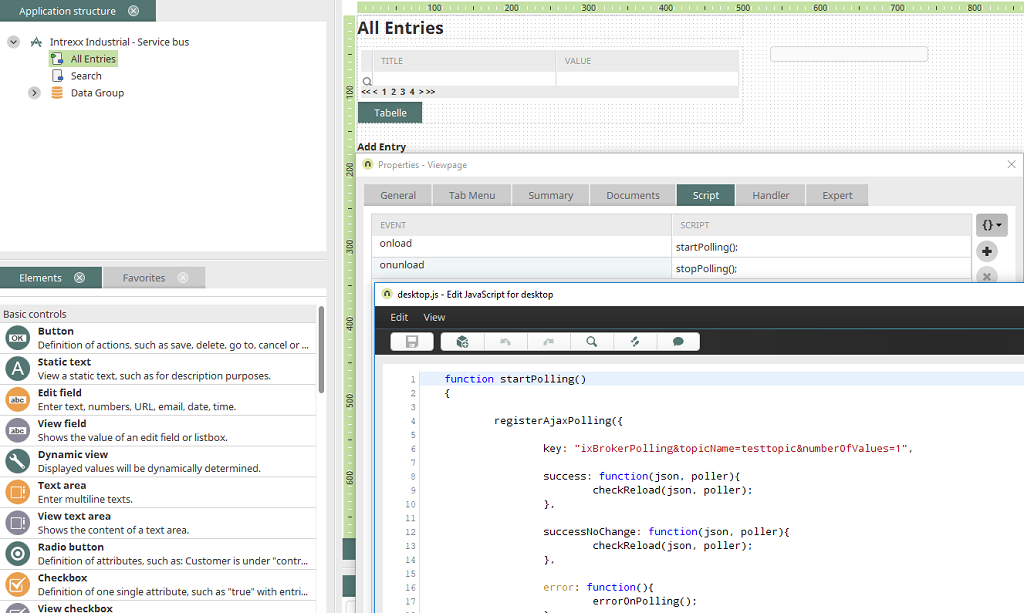
Add the following JavaScript to a page of your choice (in our example, we have added it to the "All Entries" page).
function startPolling()
    {
		registerAjaxPolling({
				/*
				* topicName: <NAME OF THE SERVICEBUS_TOPIC>
				* numberOfValues: Maximum amount of Messages since last request
				*/
				key: "ixBrokerPolling&topicName=testtopic&numberOfValues=1",
				success: function(json, poller){
						checkReload(json, poller);
				},

				successNoChange: function(json, poller){
						checkReload(json, poller);
				},

				error: function(){
						errorOnPolling();
				},
				/*
				* id: unique ID for this polling sequence
				*/
				id: "testId",
				millisec: 5000
		});
    }


    function checkReload(json, poller)
    {
        var resultStr = ""
		//returned json contains an array, if numberOfValues > 1

		if (json.values){

			var jsonArray = json.values

			for (var i = 0; i < jsonArray.length; i++) {
               resultStr += jsonArray[i].value + "\n";
            }
         }

        if (json.value){
            resultStr = json.value;
        }

		/*
		* Add your code here...
		*/
		alert(resultStr);
    }
| Additional server configurations do not need to be made in this case. Different from the polling document, additional Spring configurations are not required here. |
function stopPolling()
    {
            unregisterAjaxPolling("ixBrokerPolling&topicName=testtopic&numberOfValues=1", "testId");
    }


    function errorOnPolling()
    {
            Notifier.status.notify("Text: Error on retrieving reload information", "Titel: Polling", "ID: MyId");
    }
5. More information
- Intrexx Industrial
- Test MQTT Broker
- MQTT in Intrexx
- Polling
- Increased perfomance by only refreshing specific elements on a page
- Complete Java Sample Code for a seamless integration in the Processes module (event source, event handler and action)
- Configuration of an MQTT Message Broker
- http://docs.oasis-open.org/mqtt/mqtt/v3.1.1/os/mqtt-v3.1.1-os.html