Application Store - Project management
1. Import
Once you have downloaded the Project Management app from the Application Store, you can import the downloaded file as usual. Keep the setting Import with permissions so that all portlets, pages and data groups are already provided with the correct permissions. During the import, you can automatically create the required Project Management user groups as a new object or assign them to existing user groups.2. License
Intrexx Project Management can be licensed via the Extras main menu / License Manager.3. Permissions
For the app, users are divided into three groups each with different permissions:- Projektmanagement-GF (for the management)
- Projektmanagement-PM (for project managers)
- Projektmanagement-MA (for project members)
4. Configure application portlets
Project Management contains three predefined portlets. These portlets filter the project information for the three user groups.- Projects MNG (view of all current projects)
- Projects PM (view of own projects for project managers)
- Projects of Others (view of project tasks that have been assigned to employees)
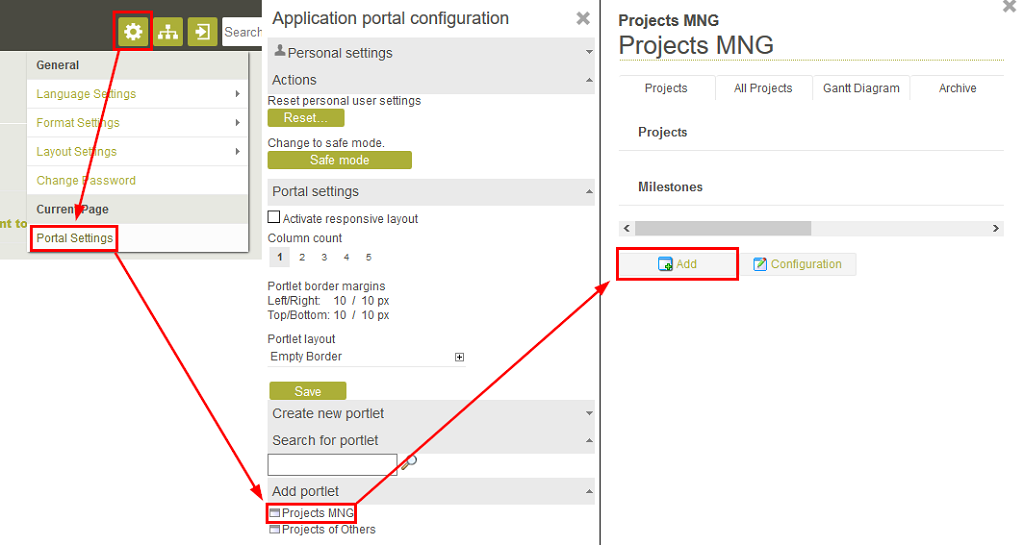
Add the "Portlet GF" via the Portal settings.
The portlet will now be shown on the homepage. If you log in with a user from the "Projektmanagement-PM" or "Projektmanagement-MA" group, you can add the other portlets here. In this way, every user is provided with the the information relevant to them.
5. Time record portlet
The "Time record" portlet allows the time expended on a task to be entered in a convenient manner. Log in with a member of the user group "Projektmanagement-GF".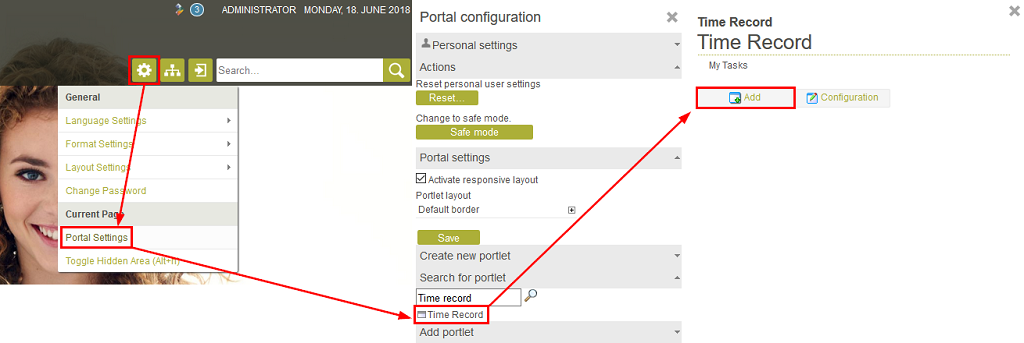
Add the "Time record" portlet to your portal start page. If the portlet is not selectable, check whether the user has the corresponding permissions and whether you are on the portal homepage.
The portlet will now be shown on the portal homepage.
6. Administration
Log in to the portal in the browser with a user who is a member of the user group "Projektmanagement-GF" and open the Project Management app. Open the menu "Administration"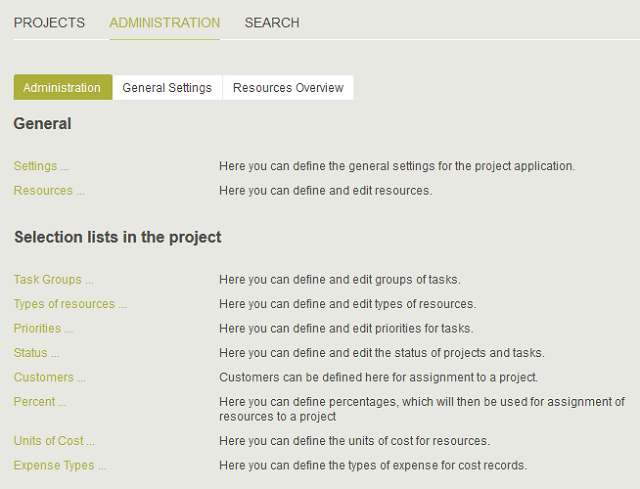
This page contains the general settings, settings for drop-down lists and an overview of the project resources.
6.1. "Administration" tab
6.1.1. General
The links "Settings" and "Resources" switch to the tabs "General settings" and "Resources overview".6.1.2. Selection lists in the project
The entries in the drop-down lists on different edit pages in the Project Management can be administrated here.Tasks group
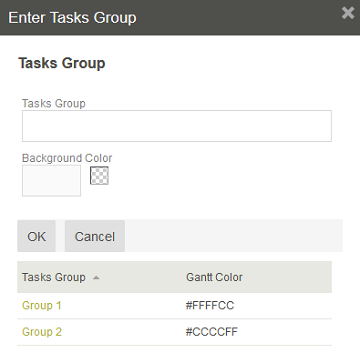
Opens a dialog where task groups can be defined. Each task group can be assigned an individual color for its display in the Gantt diagram. If you wish to change an existing task group, please click on the corresponding link in the "Task group" table column. Save your changes.
Resource types
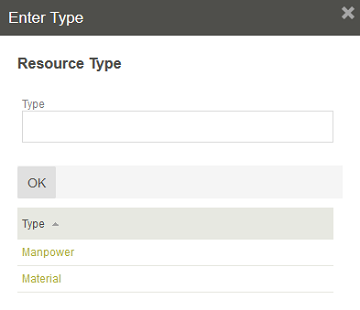
The resource types are managed here. These are used to categorize resources.
Priorities
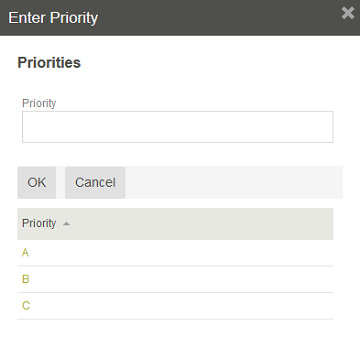
Define priorities for tasks here.
Statuses
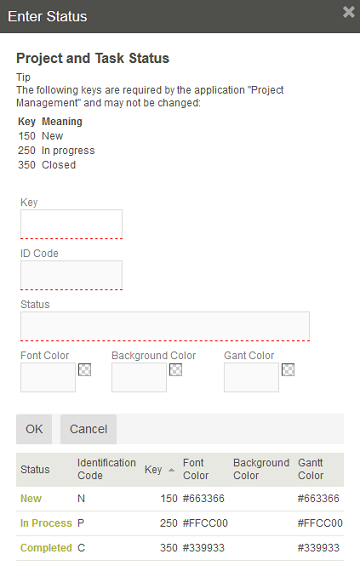
Statuses defined here will manage the progress of tasks and/or the progress made on the entire project. The keys for the three statuses "New", "In process", and "Completed" cannot be changed. However, it is possible to add additional statuses to the list. When entering a new status, please take note of the following status ranges in order to assign it a rank that makes sense
- New
Key 150 (validity range 125-174) - In Process
Key 250 (validity range 225-274) - Completed
Key 350 (validity range 325-374) - Open
Status less than 275 - Completed
greater than/equal to 325
Customers
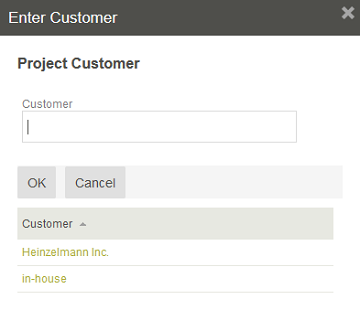
Projects can be assigned to customers entered here. For internal projects, use the customer "in-house".
Percent
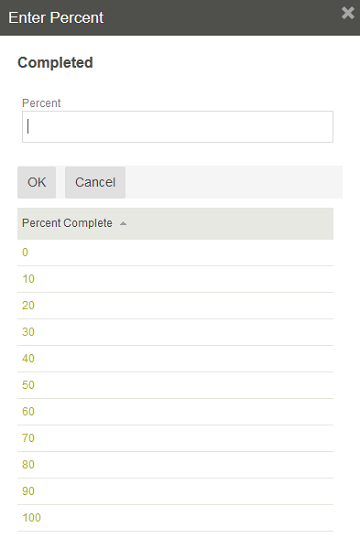
The assignment of a resource to a project will be set here as a percentage.
Units of cost
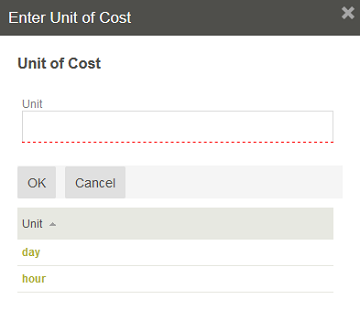
Define the units of cost for the use of resources for tasks here.
Expense types
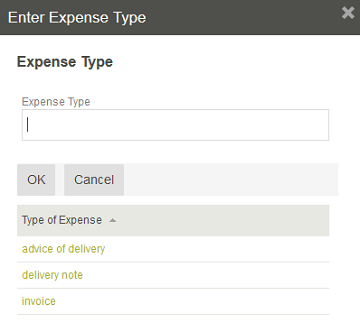
Types of receipts for recorded expenses will be managed here.
6.2. "General settings" tab
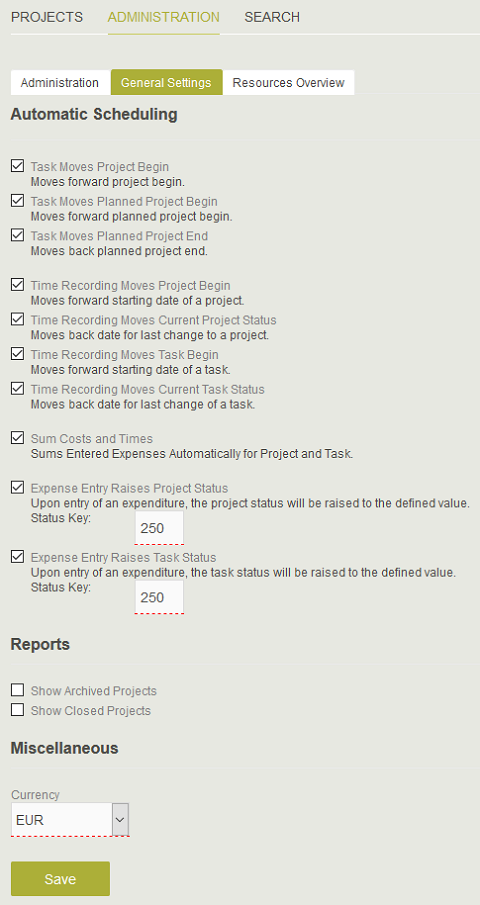
6.2.1. Automatic scheduling
This area will allow you to define whether the start and/or end date of newly created or changed tasks and time recordings will affect the project start or end date.Aufgabe verschiebt Projektbeginn
Task moves project begin
Tasks whose start date lie before the beginning of the project will move the project begin date to the start date of the task with this setting.Task moves planned project begin
Tasks whose start date lie before the start date of the project will move the planned project begin to the start date of the task with this setting.Task moves planned project end
Tasks whose end date lie after the project end will move the planned project end to the end date of the task with this setting.Time recording moves project begin
Time recordings, whose start dates lie before the start date of the project, will move the project start date to the start date of the time recording with this setting.Time recording moves current project status
Time recordings, whose end dates lie after the date of the last change to the project, will move the date for the last change to the project to the end date of the time recording with this setting.Time recording moves task start
Time recordings, whose start dates lie before the start date of a task, will move the start date of the task to the start date of the time recording with this setting.Time recording moves current task status
Time recordings, whose end dates lie after the date of the last change to a task, will move the date of the last change of a task to the end date of the time recording with this setting.Sum costs and time
Adds together recorded expenditures for projects and tasks.Cost recording increases status of project
When entering expenditures, the project status will be raised to the defined value. The standard value is "250", which corresponds to a status of "In Process". When entering an expense, the status of the project will automatically be set to "In Process".Cost recording increases the status of a task
When entering expenditures, the task status will be raised to the defined value. The standard value is "250", which corresponds to the status "In Process". If an expense is entered for a new task, the status of the task will automatically be set to "In Process".6.2.2. Reports
Show archived projects
This setting will include archived projects in all reports.Show completed projects
This setting will include completed projects in all reports.6.2.3. Miscellaneous
The currency for recording costs in projects will be defined here. Select the desired currency from the drop-down list. By clicking on "OK", all settings will be saved.6.3. "Resources overview" tab
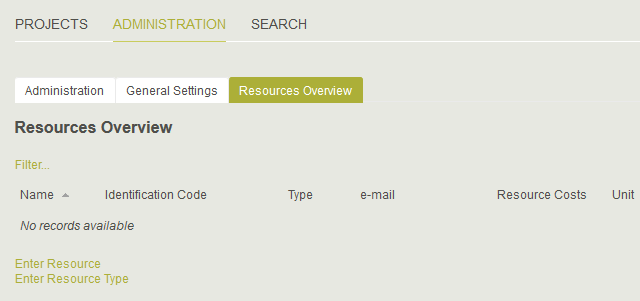
All project resources will be managed on this tab.
Filter
Shows a drop-down list that allows you to filter the table by resource type.Enter resource
Opens a dialog where a new resource can be created.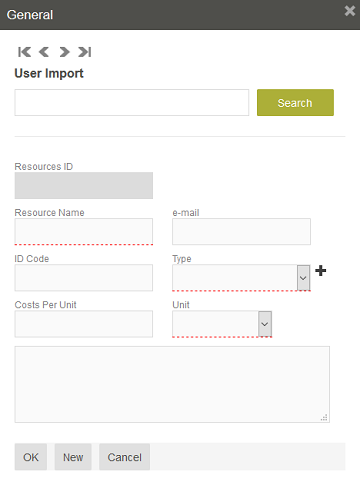
User import
Her, you can search for users that have been defined in the Users module for the portal. If you leave all fields blank here and click on "Search", the full list of all users will be shown that you can select a user from.Resource ID, Resource name, ID code, email
These fields are filled in automatically after a user import.Type
Determine the resource type here.Opens the Resource type dialog where you can add a new resource type directly from here.
Cost per unit
The costs that arise for each booked unit can be defined here.Unit
Select the unit ("Hour", "Day") aus.Description
The resource can be provided with a description here.7. Create project
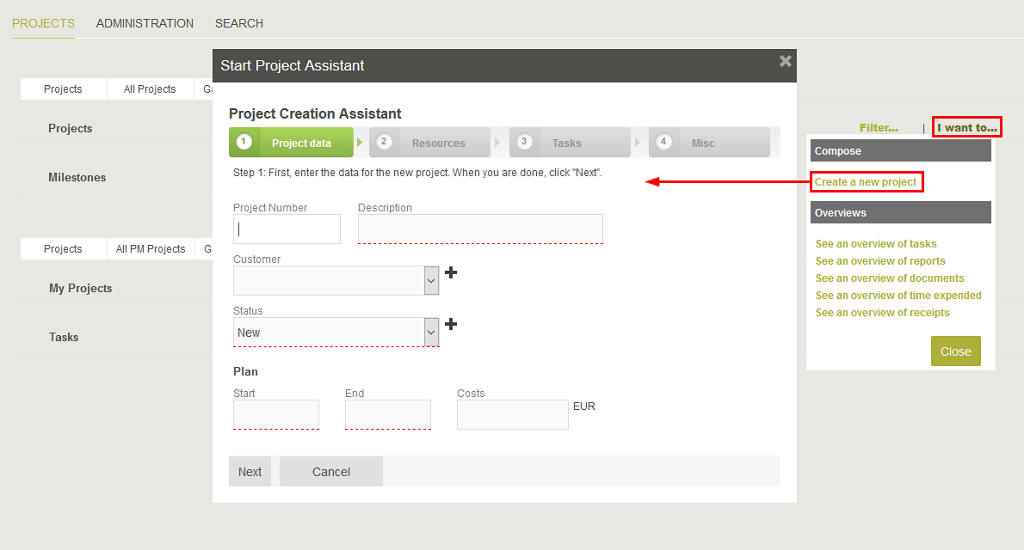
Log in to the portal in the browser with a user who is a member of the user group "Projektmanagement-GF" and open the Project Management app. Click on the link "I want to..." on the homepage. Select "Create a new project" from the menu. This will open the wizard for creating a new project.
7.1. Project data
Project number
Enter a project number here.Description
Provide the project with a title here.Customer
Select the customer who the project relates to. Select the entry "in-house" for internal projects.Status
The status of a new project will automatically be defined as "New".Plan
Start, End
Enter the planned start and end date of the projectCosts
Enter the planned costs. Click on "Next".7.2. Resources
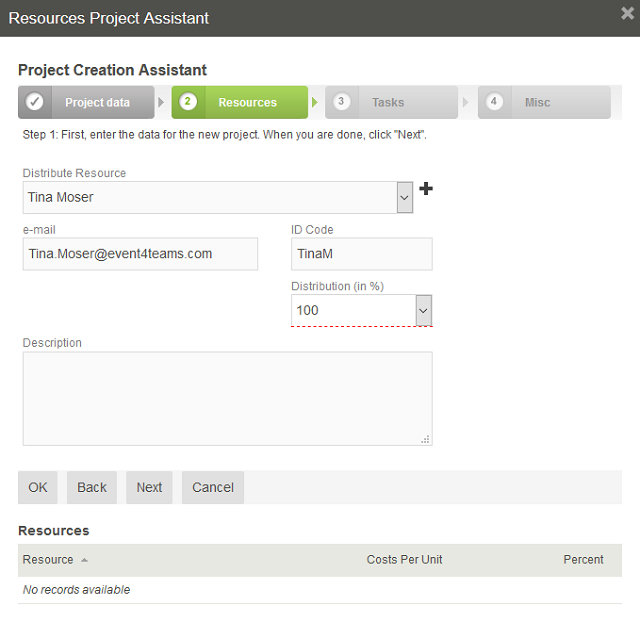
Distribute resource
Select a resource that will be used for the project.| Project tasks can only be delegated to a user if they are defined as a resource here and have the corresponding permissions. |
Opens a dialog where a new resource can be entered directly from here.
ID code, email, description
These are automatically populated with the data from the Administration.Distribution (in %)
Defines the percent of the resource that will be assigned to the project.OK
When you click on "OK", the resource will be shown in the table below the edit fields. As long as you do not click on "Next", you can assign additional resources.7.3. Tasks

Click here for more information about the entries in this dialog.
OK
Multiple tasks can also be defined here, provided you do not click on "Next".7.4. Misc
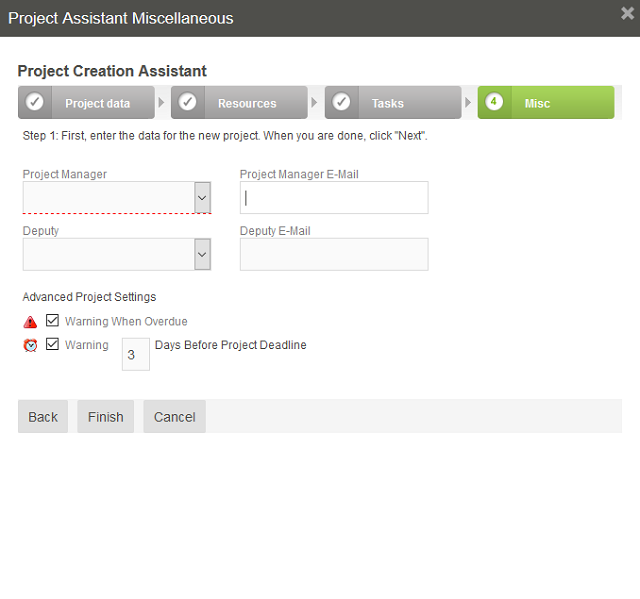
Project manager, Deputy
Select the project manager and their deputy here.Project manager email, Deputy email
These are automatically populated with the data from the Administration.Warning when overdue
The project will be shown on the homepage and on the Project tab with a icon if the end date
expires without being completed.
icon if the end date
expires without being completed.
Warning ... days before project deadline
The project will be shown on the homepage and on the Project tab with a icon
icon
Finish
Saves the project.8. Homepage
Depending on your permissions, you will see different information on the homepage of the Project Management application, if the corresponding application portlet has been configured.8.1. Portlet GF

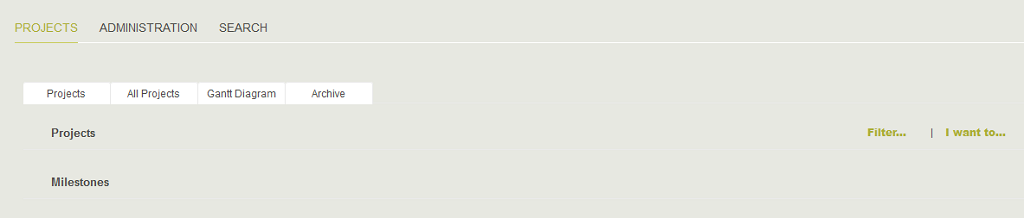
Projects
All running projects are listed here, if a member of the user group "Projektmanagement-GF" is logged in to the portal.Milestones
Every task that has been marked as a mileston is shown here."I want to..."
Click here for more information."All projects" tab
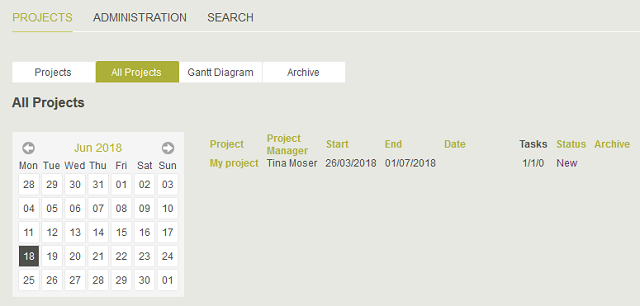
The project list can be filtered by date here.
"Gantt diagram" tab
The course of the project is shown graphically here.
Reiter "Archiv"

This page lists all archived projects. These can be filtered by date.
8.2. Portlet PM
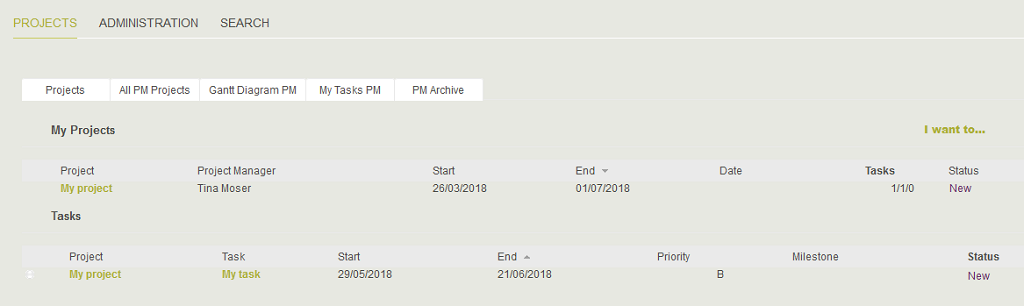
If a member of the "Projektmanagement-PM" user group is logged in to the portal, the homepage looks something like the picture above. Project managers can only view projects that they have been assigned to as the project manager or deputy. The "Tasks" area contains a list of all project tasks. The other tabs available here only display data relating to the project.
8.3. Portlet MA
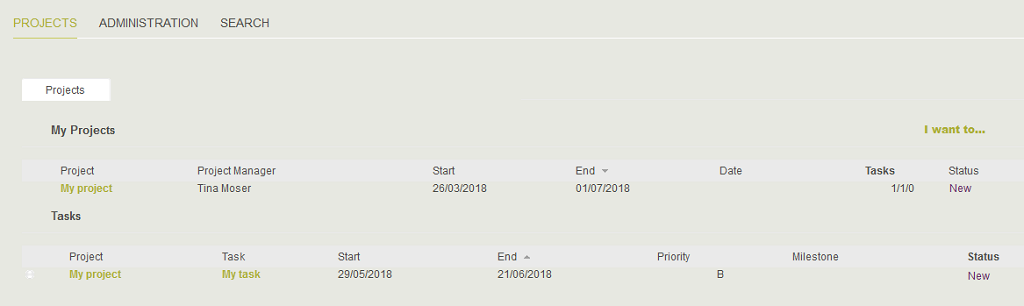
If a member of the "Projektmanagement-MA" user group is logged in to the portal, project details cannot be modified. The project tasks of the respective employee are shown in the "Tasks" area. Employees cannot create new projects. Furthermore, the overviews are limited and only provide data entered by the employee themselves. Other tabs are not available.
9. Project details
The tabs available here are based on your permissions, when you click on a project name on the homepage. This opens the project details.9.1. "Project" tab
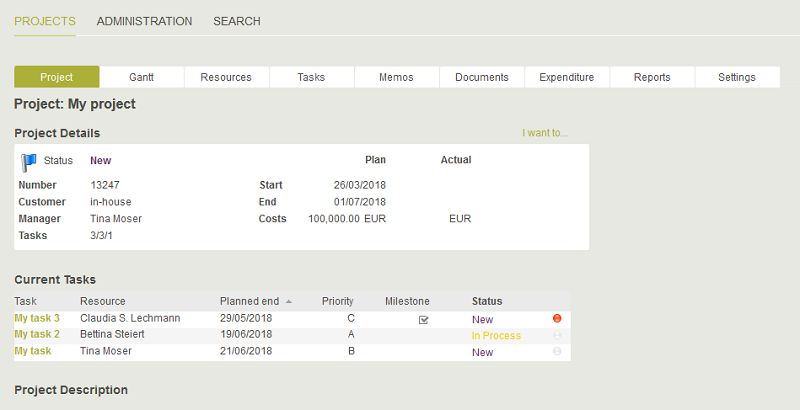
Project details
The planned start and end date and all costs are shown in the "Plan" column. All costs accrued in the progress of the project, that have been entered via receipts or time recordings, will be collated in the "Actual" column. The actual start and end data is identified from the tasks. "Tasks" provides information about the- Sum of all tasks (1st number)
- Number of open tasks (2nd number)
- Number of overdue tasks (3rd number)
Offene Tasks
The "Open tasks" table will show all incomplete tasks. Clicking on a link to a task will open the task for editing, provided you have permission. You will be notified of overdue tasks in the last column and of the the task status in the column before. Completed tasks are not listed here but on the Tasks tab.9.1.1. "I want to" menu
The link "I want to..." at the top right opens a menu with additional functions. This menu also depends on the permissions of the logged-in user.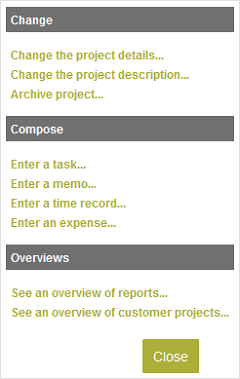
Change the project details, Archive the project
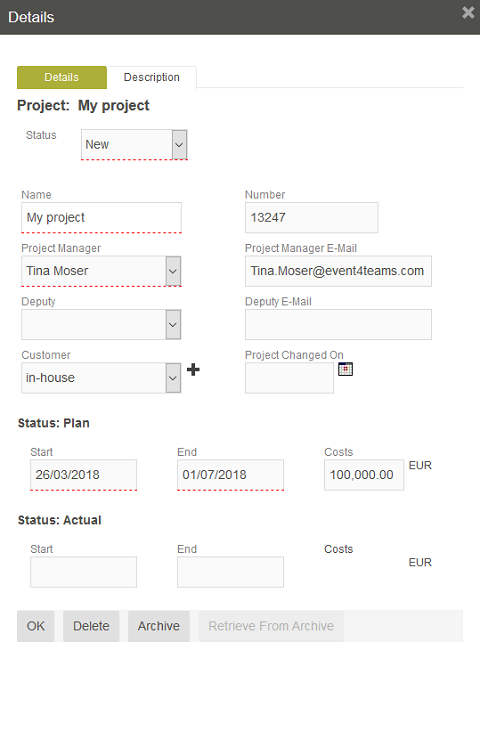
Opens the "Details" dialog where the project data can be edited, deleted, archived or retrieved from the archive.
Project description

The project description can be modified here.
Enter a task
Opens a dialog where a task can be defined.Enter a task memo
Opens a dialog where a memo can be written.Enter a time expenditure
Opens a dialog where a time expenditure can be recorded.See an overview of reports
Switches to the Reports tab.See an overview of customer projects
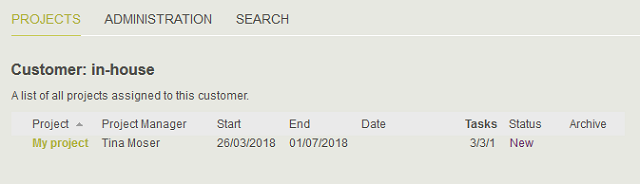
Opens a page where all projects, which have been assigned this customer, are listed.
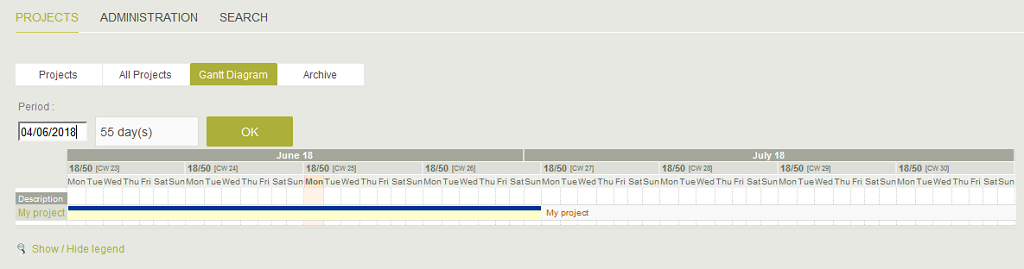
9.2. "Gantt" tab
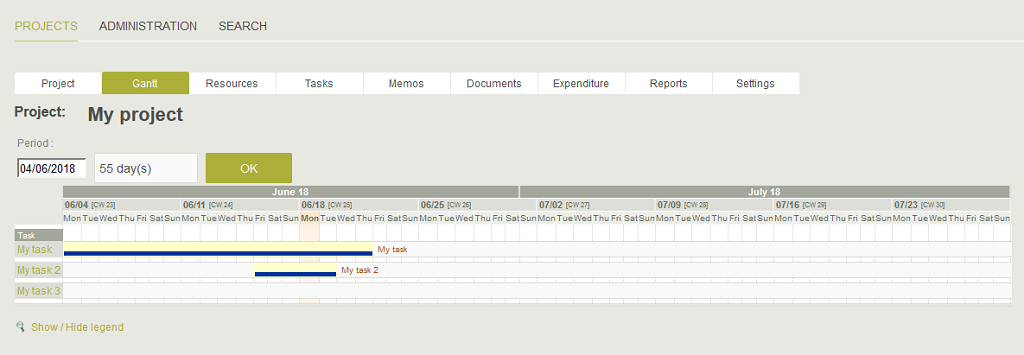
On this tab, all project tasks will be displayed graphically. The current day will be highlighted in color. If the mouse cursor is placed over a task, its details will be shown as a quicktip. Completed tasks are presented with a green bar.
Period
If you enter a date here, the chart will show the number of days, which you enter in the second field, from this date.Show / Hide legend
Shows or hides the legend, respectively.9.3. "Resources" tab
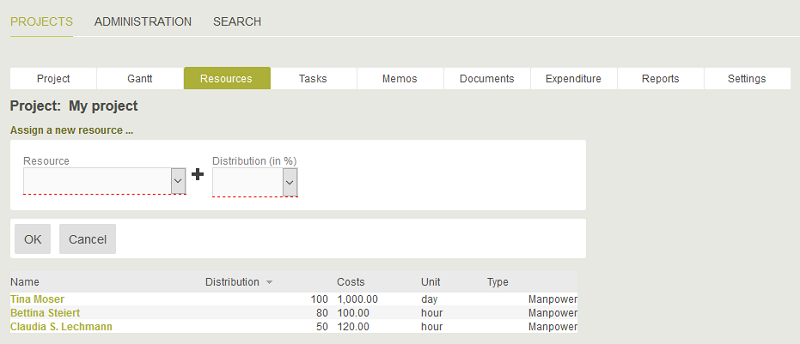
On this page, all resources will be shown. New resources can be assigned to the project with a distribution.
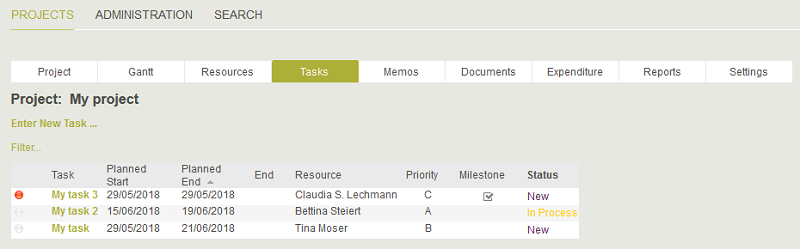
9.4. "Tasks" tab
On this page, all project tasks will be shown. New tasks can be defined via the link "Enter new task".
9.5. "Memos" tab

Enter new memo
Clicking on the "Enter new memo" link will show the edit fields.Subject, Description
The subject and text for the memo can be written here.Email recipients
Two lists will be shown after clicking on this link.Not selected
Contains the email addresses that the memo will not be sent to.Selected
Contains the email addresses that the memo will be sent to.Moves the email addresses from one list to the other.
OK, OK + email
Saves the memo or saves the memo and sends the content to the specified recipients, respectively. Saved memos are listed in a table at the bottom of the page.Filter
Shows the fields that can be used to filter the saved memos by subject and date.9.6. "Documents" tab
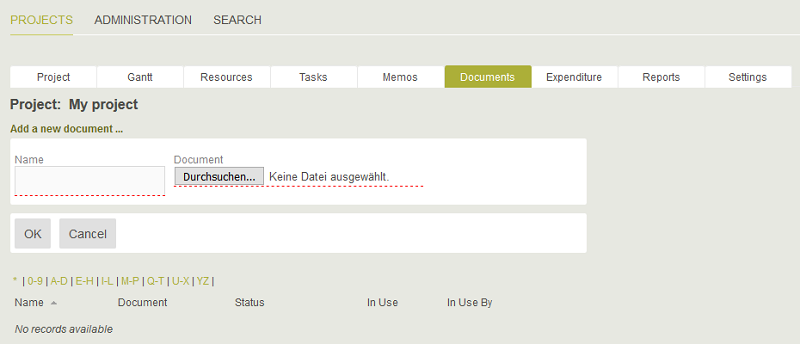
Add a new document
A new document can be added by clicking on this link.Name
Enter a name for the new document here.Document
Click on "Browse" to select a document for upload.OK
Saved documents are listed in a table at the bottom of the page.9.7. "Expenditure" tab
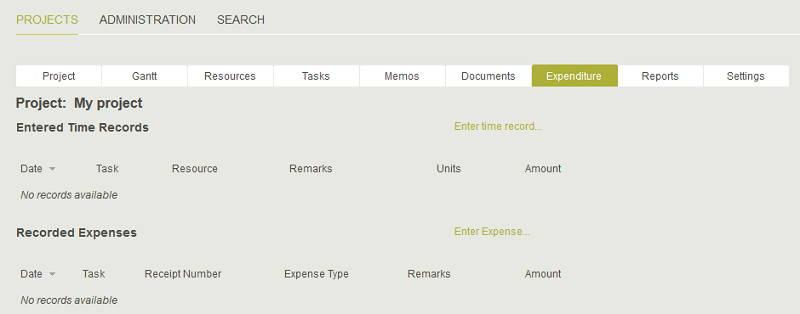
Enter time record
Shows a dialog where new time expenditures can be recorded. Saved time expenditures are listed in a table at the bottom of the page.Enter expense
Shows a dialog where a new expense can be recorded. Saved expenses are listed in a table at the bottom of the page.9.8. "Reports" tab
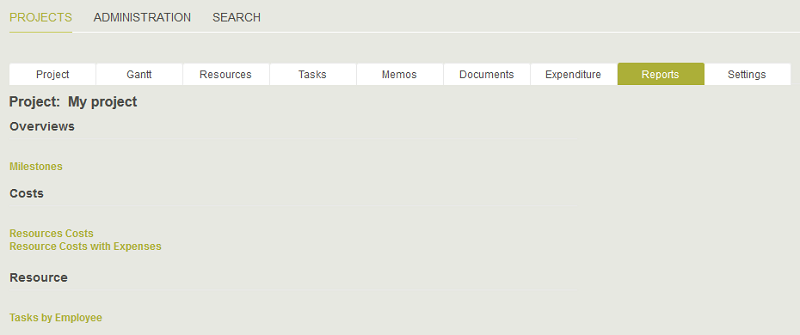
Milestones, Resource costs, Resource costs with expenses, Tasks by employees
Click on one of these links to open the corresponding report.9.9. "Settings" tab
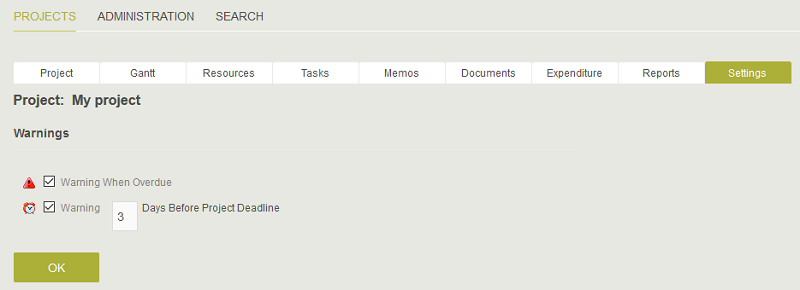
The general settings for the project can be edited here.
10. Tasks
Project tasks can be defined or edited at different points in the project. The edit page described here can be access via the "I want to..." link on the "Project" tab.10.1. Create task

Milestone
If a task is marked as a "Milestone", a start date will not be entered.Task
Enter the task here.Resource
Select the resource who should be responsible for the task.Priority
Define the task's priority.Task group
Select the task group.Gantt position
The position of the task in the Gantt diagram can be defined here. The lower the value entered, the higher the position in the Gantt diagram.Switches to the Description tab.
Status: Planned
Start, End
Enter the planned beginning and end.Status: Actual
Start, End
Is entered automatically, as soon as the task is in process.Status
When a new task is created, the status is automatically defined as "New". If you are a member of the user group "Projektmanagement-PM" (Project managers), you can edit the status of the task to "In Process" or "Completed".Current status
Displays the date of the last changeCosts
The costs of the relevant expenses are added together here.Delegate task
Click here for more information.10.2. Description
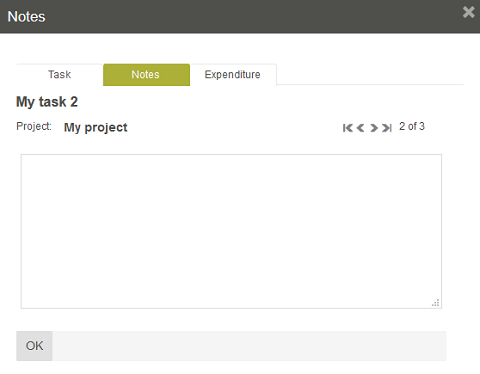
The task can be provided with a description here.
10.3. Expenditure
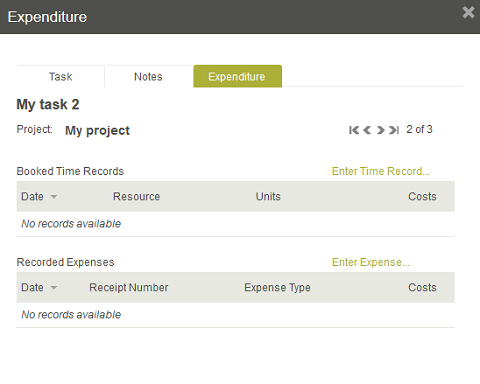
The recorded time expenditures and expenses are shown in the respective table. Click here for more information.
10.4. Delegate task
A task can be delegated to a different employee by clicking on the "Delegate" link.
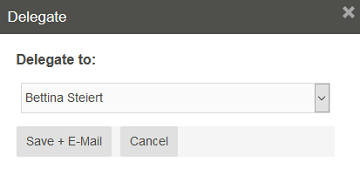
OK + E-Mail
Sends a notification to the employee who the task was delegated to. This is only possible if the email address has been defined in the resource administration and the email service tool has been configured.11. Time recording
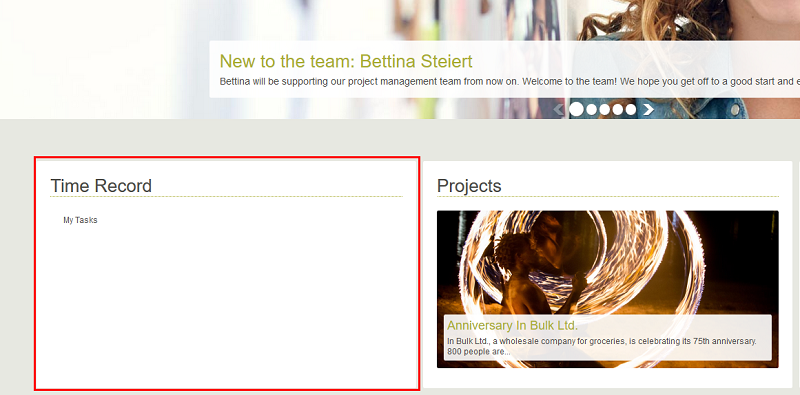
11.1. Time record portlet
The time expenditure for a task can be quickly and easily entered here. Click here for more information about how to add this to the portal home page.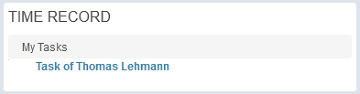
click on the
 icon here,
if you wish to begin a time recording.
icon here,
if you wish to begin a time recording.
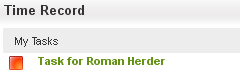
The
 icon shows that the
time recording for a task is currently active. If you wish to stop the
recording, please click on the icon again.
icon shows that the
time recording for a task is currently active. If you wish to stop the
recording, please click on the icon again.
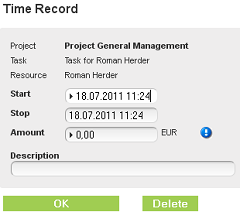
The start and end of the recording will be shown in a popup window. Additionally, based on the data that you have entered in the resources administration, it will calculate the costs of the recorded time. In the "Booking text" field, a description of the time recording can be entered. Save the recorded time expenditure by clicking on "OK".
11.2. Manually record a time expenditure
Time expenditures can be entered manually at different points in the project, for example on the "Project" tab or via the I want to... link.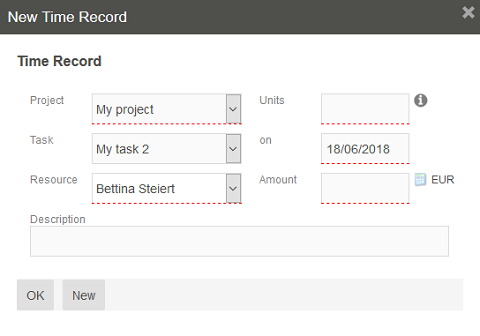
Project
The project can be selected hereTask
The task that the time expenditure is being recorded for can be selected here.Resource
Select the resource.Units
Enter the number of units used.Provides information about the resource's units and costs as defined in the administration.
On
The current date is entered automatically but it can be edited.Amount
The amount can be entered here.Calculates the costs from the selected unit and the costs defined for the resource in the administration.
12. Record expenses
Expenses can be recorded at different points in the project, for example on the "Project" tab or via the I want to... link.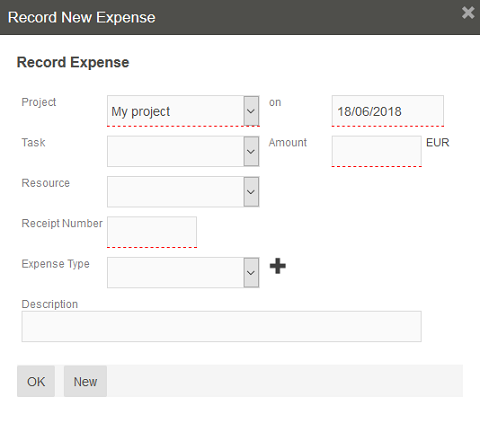
Project
The project can be selected hereTask
The task that the expense is being recorded for can be selected here.Resource
Select the resource.Receipt number
Enter the receipt number here.Expense type
Select the expense type.On
Enter the date of the expense here.Amount
Enter the amount.Description
A description can be entered here.13. Reports
13.1. Comprehensive project reports
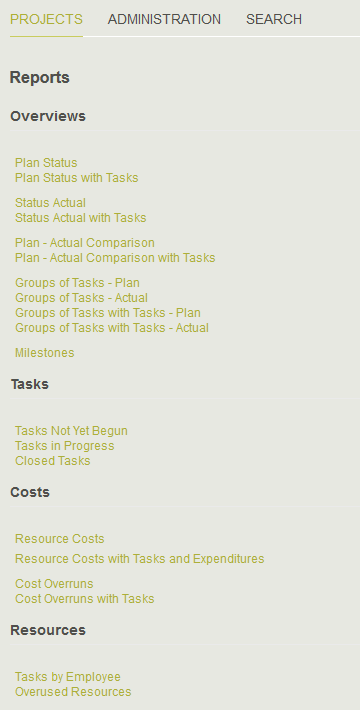
On the homepage of Project Management, members of the management and project managers can reach comprehensive analyses of projects from the menu item "I want to..." / "See an overview of reports".