Connector for SAP Gateway in applications
Set up access to an external data groupData types
References
Files
OData Function Imports
Set up access to an external data group
A connection to a SAP System, which was configured with the Connector for SAP Gateway in the Integration Manager, can be used in any Intrexx Application. Create a new external data group, using the context menu of the application node.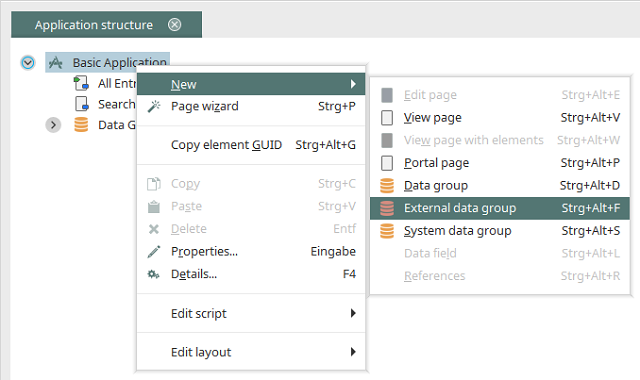
The dialog for selecting the external data connection opens automatically.
Enter the Title of the new external data group. The required connection can be selected from the drop-down list Database connection. The appropriate data handler for an OData database connection will automatically be entered in the drop-down list Datahandler. You can enter the name of the Table or View, or click on
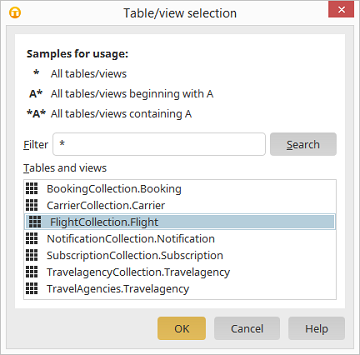
You can search for the name of the table or view here. In the field Filter, enter a character string that should be search for. The character * serves as a placeholder for any character. A* will find any table or view that begins with A. *A* will come back with any element that contains the letter A. Highlight the desired library or list in the lower section of the dialog and then click on OK.
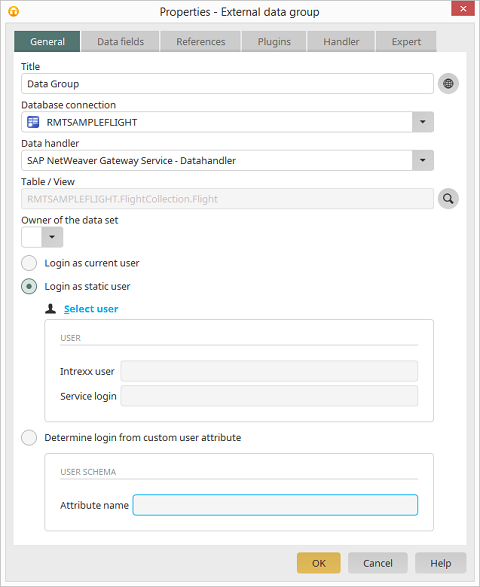
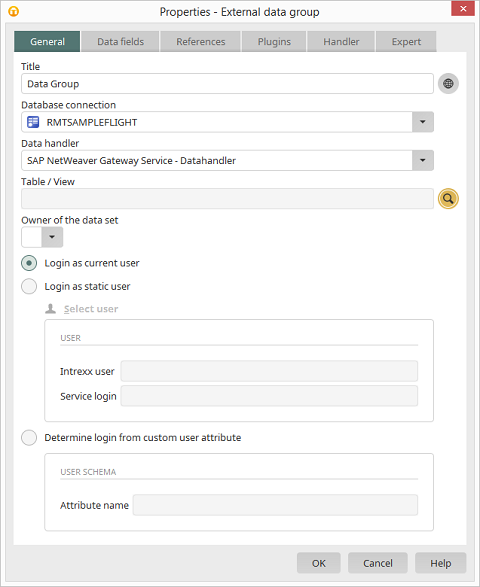
At the bottom, the type of application is defined. With the option Login as current user when the page, on which the SAP Gateway connection is integrated, is called, the SAP login credentials of the current portal user will be requested. With the option Login as static user a registered SAP User can be used to login. Click on the Select user link.
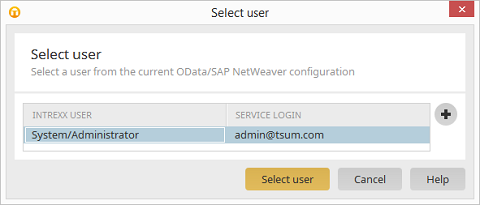
Here you have the option to set additional users up. Then click on OK.
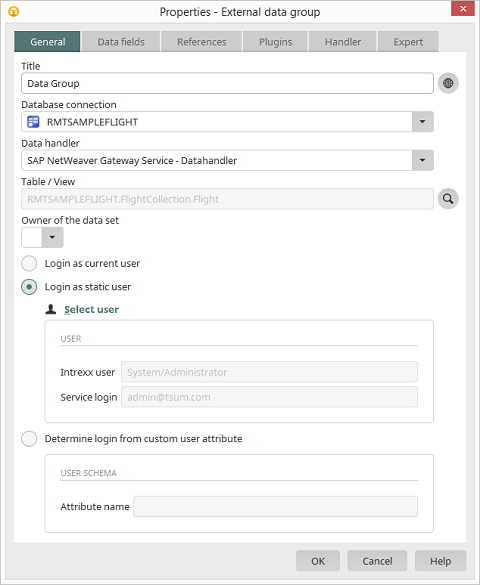
The login details of the static user are now registered. The required data fields, which are to be provided by the OData Service, can now be selected on the Data fields tab, and associated with the elements in the Intrexx application.
Data types
At the selection of the data fields, the Connector automatically converts the OData data type to the appropriate Intrexx data type. The following characteristics should be noted:- In contrast to Intrexx, OData defines different data types for date and time. In Intrexx, all Odata data/time data types are converted to the datetime data type. Conversely, Intrexx date values will be converted by default to the Odata Edm.DateTime data type. In some circumstances you can define the service, but with a different date data type. In this case, the correct Odata data type is recorded in the expert settings of the relevant fields.
- OData defines so-called complex data types. This is a grouping of several simple data type fields into one of a new complex data type. For example, the fields Street, Postal code and Town could be summarized into a complex data type Address. Since Intrexx does not recognize complex data types, these will be converted to several Intrexx data fields. In order to guarantee the uniqueness of the name of such a field, the name is created from the components <Name of the complex data type>/<Fieldname>, so, for example, Address/Town.
References
1:1 Relationships
In Intrexx, references can be made to any data groups. Where the output data group and the referenced data group are both external data groups from an OData connection, then a 1:1 relationship can be established between these, provided that a corresponding relationship is defined in the service metadata.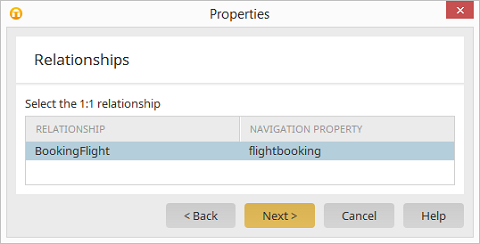
With a 1:1 relationship between two OData external data groups (OData terminology: Entity Sets) no primary and external keys need to be determined. In OData references, the relationship type is determined and selected directly from the metadata of the OData service. Thus, for example, the possible relationships between a seminar and a room booking are automatically determined by the Connector for OData from the service metadata and made available for selection. Then click on Next. The data fields required can be selected in the next step.
1:n Relationships
Relationships of type 1:n between OData data groups are represented with parent data groups (e.g. Flights) and subordinate child data groups (e.g. Bookings) in Intrexx. If you establish the database connection in the properties of the child data group, and select the corresponding OData Collection (Table), then the potential 1:n relationships will be made available for selection.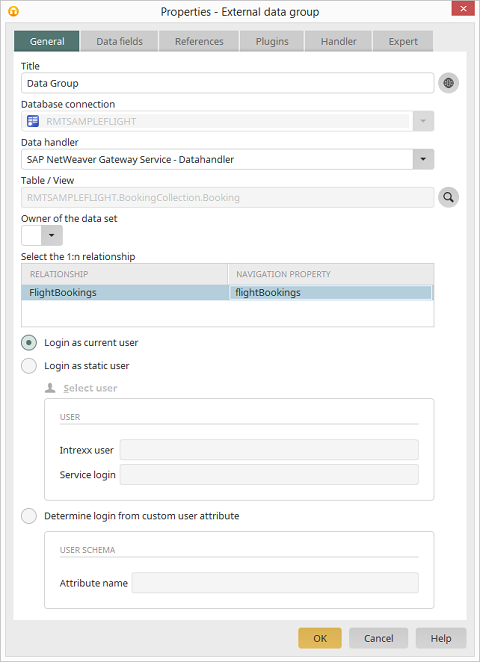
In the next step, the data fields for the child data group can be selected. It will then be possible to display dependent records from child data sets in view tables on view and input pages of the parent data groups.
m:n Relationships
The Velocity Callable ODataLinksCallable can be used to create and remove m:n relationships between two OData external data groups.Creation of an m:n relationship:
$ODataLinksCallable.createLink(<Configuration GUID>, <Service GUID>, <Impersonation GUID>, <Source DG GUID>, <Source_Record_ID>, <Target Navigation Property>, <Target DG GUID>, <Target_Record_ID>)
$ODataLinksCallable.deleteLink(<Configuration GUID>, <Service GUID>, <Impersonation GUID>, <Source DG GUID>, <Source_Record_ID>, <Target Navigation Property>, <Target DG GUID>, <Target_Record_ID>)
- Configuration GUID
The GUID of the OData configuration - Service GUID
The GUID of the OData Service - Impersonation GUID
The GUID of an impersonation user, or "null" for the current user - Source DG GUID
The GUID of the source data group - Source Record ID
The ID of the source data record. - Target Navigation Property
The name of the OData Navigation Property which defines the relationship. - Target DG GUID
The GUID of the target data group. - Target Record ID
The ID of the target data record.
Files
Binary data fields
OData data fields of the type Edm.Binary (BLOB) will be treated as data type File in Intrexx. This enables binary data to be stored in Intrexx file fields. Since it is not possible to determine automatically from OData the file type of binary fields, the file type can be stored in the expert settings of the data field.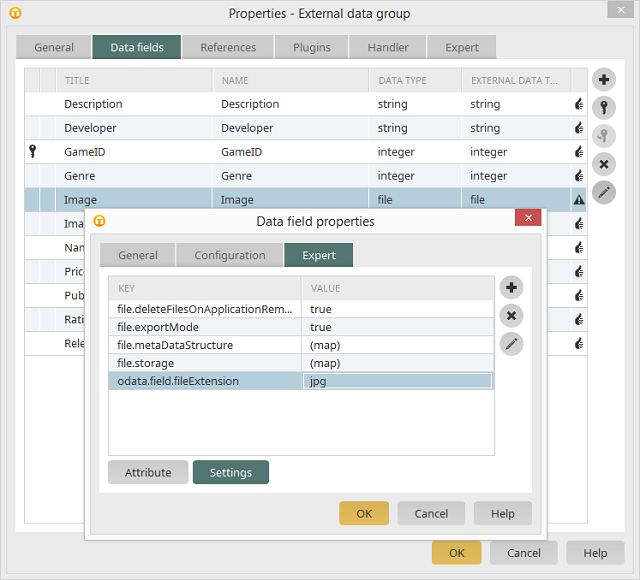
This will automatically be used as the filename extension when the binary data is saved. Currently, only one file type per field can be defined for all data records. For accessing and manipulating files, OData (Version 2.0 or higher) offers Media Link Entries. These are the recommended method for accessing binary data.
Another possibility to enable downloading of the contents of binary fields uses the callable method $OdataMediaResourceCallable.getDownloadURIForBinaryProperty(). This generates a URL, which can be inserted in a download link on an entry or view page:
<a target="_blank" href="$ODataMediaResourceCallable.getDownloadURIForBinaryProperty($ProcessingContext, $DC.getRecId(), '<GUID_DATAGROUP>', '<BINARY_PROPERTY NAME>', '<FILE_NAME>','CONTENT_TYPE', '<DISPOSITION_TYPE>')">Download File</a>
Media Link Entries
An entity type can be defined as a Media Link Entry in an OData service. This type of entity is marked with the attribute HasStream in the service metadata document. The fields of a Media Link Entry then describe a so-called Media Resource, which can in turn be any file type, such as a document, an image or a Video-/Audiostream. An Entity Collection of type Media Link Entry is then a collection of files, whereby one Media Link Entry describes just one file.In contrast to BLOB fields, where the entire file is included as a binary (Base 64 encoded) data structure along with the other data fields in the XML response document, only the URL of the Media Resource (i.e. the file) can be obtained from a query of the Media Link Entry. Using the URL, the file can then be accessed in a browser or downloaded in the conventional manner. Since the file is not embedded as code in an XML document, Media Link Entries offer a much more efficient mechanism for accessing files.
Since a Media Link Entry describes not only the file itself (metadata) but also the access path to the file on the server, two HTTP requests are necessary for querying the metadata and downloading the file. Similarly for the creation of a new Media Link Entry, for example, if a new file is to be uploaded via the OData Service, or an existing file needs to be updated. In the following section, how to enable the display or download a file from Media Link Entries in Intrexx will be described, as well as how to save other files as Media Link Entries on the OData server.
Display/download files from Media Link Entries
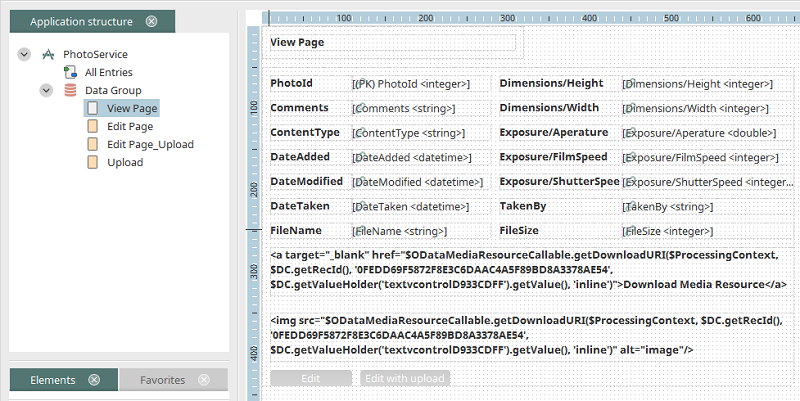
Since the metadata fields of a Media Link Entry consist of ordinary OData data fields, these can be represented in the usual manner on a view or edit page in Intrexx. To enable the display or download of a Media Resource, a link for the resource must first be generated, which calls an Intrexx Servlet, which in turn requests the file via the OData service, and forwards it to the browser. Thus the adapter includes a special Velocity Callable, which prepares the link in a manner such that it can be embedded in view/edit pages. Therefore, on a view page, (subordinate to an OData data group for Media Link Entries), create a Static Text for Programming element. For a download link, the call to the Velocity Callable will be defined as follows:
<a target="_blank" href="$ODataMediaResourceCallable.getDownloadURI($ProcessingContext, $DC.getRecId(), '<GUID_DATAGROUP>', $DC.getValueHolder('<Control name of the field with filename>').getValue(), 'inline')">Download Media Resource</a>
This code generates a link on the display page for the download of the Media Resource. Thereby, the following parameters can be passed to the Callable:
- $ProcessingContext
The current processing context object. - Record ID
The ID of the Media Link Entry data record. - Data group GUID
The GUID of the data group which contains the Media Link Entry. - File name
Optionally, a file name for the download can be included here. This will be displayed in the browser as a pre-selection when the file is saved. In the example above, the file name is obtained from a field on the view page, which is populated via the metadata of the Media Resource. If no such field is available, a null value can be passed. - Content Disposition Type
This (optional) value specifies the Content Disposition Type of the download, that is, whether the file should be embedded direct in the browser (value inline), or if it should only be available as a download (value attachment). This value is optional, and can also be specified as null.
Uploading files as Media Link Entries
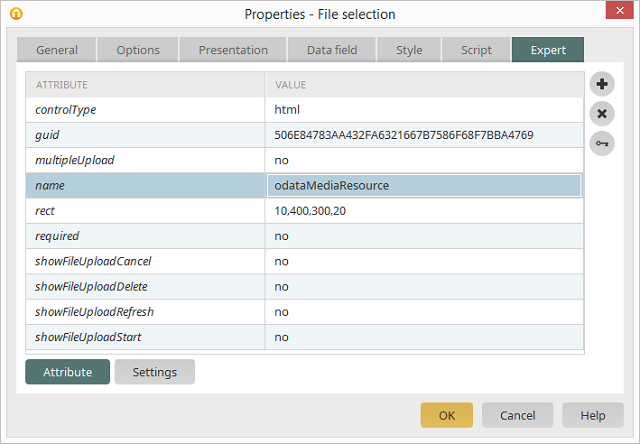
Saving and updating of files as OData Media Resources can be accomplished with an edit page associated with a Media Link Entry data group. The data fields for the Media Resource metadata can be placed on this page in the usual manner. The upload of the actual file is controlled by a File selection element. Proceed as follows:- Place a new File selection element on the edit page, and in the properties, under Data field link, select No link.
- In the Expert settings of the element, replace the entry for the attribute name with the value odataMediaResource.
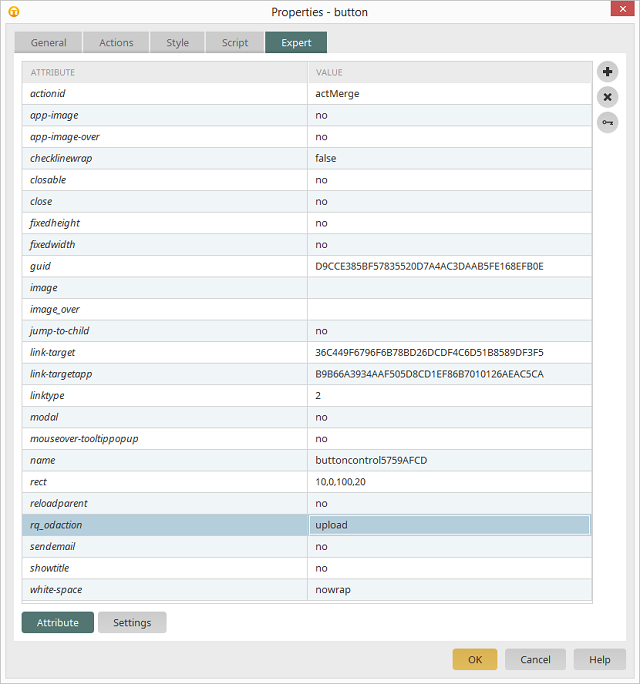
- In the Expert settings of the Save button on the edit page, a new attribute is required. The name of the attribute is rq_odaction. The value upload needs to be entered.
As a result of the architecture, during both upload and download of files between the browser and the OData server, the file must initially be cached on the Intrexx portal server. In the case of very large files, this can lead to resource shortages (especially the portal server main memory) and performance problems. In this situation, the URIs to the Media Resources should be obtained direct from the OData Feed Entry and integrated in the application page, so that access from the browser to the file is made directly via the OData server. In particular, Video and Audio stream resources can only be integrated in this manner.
OData Function Imports
Besides access to Entity Collections (tables) OData also offers the facility to define so-called Function Imports, and to run these via the service. Function Imports can be compared with stored procedures in database management systems, and can receive input parameters, and return a single record or a set of records as results. Since Intrexx offers no direct support for stored procedures, the following procedure must be used for calling function imports:- Determine the name of the function to be called from the metadata of the Service (e.g. GetProductsWithRating), the required input parameters, whether the result comes from a single record (OData Entry) or from a set of results (OData Entity Set), and the entity type (table in the Intrex data group) of the result.
- Create a view page for the parameters of the function, and a further view page to display the results of the function call.
- On the view page for the function parameters, insert an input field with the appropriate data type for each parameter, but with no data field mapping, and a button to go to the view page with the results.
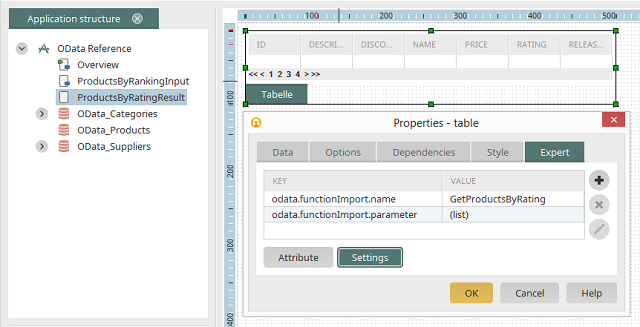
- On the results page, create a view table (in the case of a result set), select the appropriate data group (depending on function return type), and the data fields to be displayed.
- Now go to the Expert settings of the view table and define the following settings:
- odata.functionImport.name
Function name (from the service metadata) - odata.functionImport.parameterFieldGuid
List of field GUIDs for the function parameters. - odata.functionImport.parameterName
List of parameter names (from the service metadata)
- odata.functionImport.name
| Please note that the order of field GUIDs and parameter names in the two lists must match exactly. |
information regarding the expert settings can be found here.