Project management
1. Import
If you have downloaded Project Management from the Application Store, you can import it into your portal as usual. Make sure to keep the setting Import with permissions so that all portlets, pages and data groups of the application are given the corresponding, correct permissions. During the import, you can automatically create the required user groups as a new object or assign them to existing portal user groups.2. License
Intrexx Project Management can be licensed via the Extras menu / License manager.3. Permissions
For Project Management, users will be divided into three groups with different access permissions:- Projektmanagement-GF (General management)
- Projektmanagement-PM (Project managers)
- Projektmanagement-MA (Project staff)
Configuring portlets
The homepage of "Project Management" is a portal page where individual portlets can be configured. Please log in now as a user who is member of the "General management" user group and load Project Management. Project Management contains three predefined portlets with which the view of project information can be controlled in relation to the user:- Projects MNG (View all running projects)
- Projects PM (View individual projects of project managers)
- Projects ST (View of tasks for projects to which the employee has been assigned)
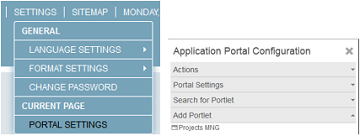
The portlet will now be shown on the start page. Every user who is involved in the project management should add his specific portlet in this way on the application start page.
Configuring the Time record portlet
The Time record portlet allows the time expended on a task to be entered in a comfortable manner. Add the Time record portlet to your portal start page.
The portlet should now be displayed on your portal page as shown above. Switch back to the "Project Management" application and then go to the "Administration" menu.
Administration
In the administration of the "Project Management" you will find general settings, settings for drop-down lists and an overview for resources.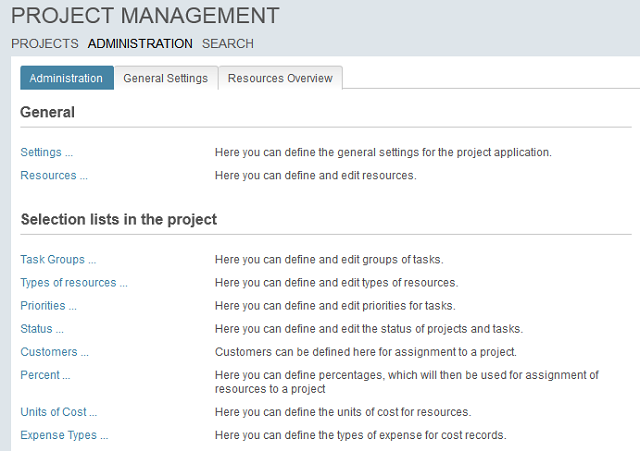
Administration tab
The links "Settings" and "Resources" serve as quick links to the "General settings" and "Resources overview" tabs. In the area "Drop-down lists" in the "Project", entries in drop-down lists to various edit pages in Project Management will be managed.Tasks group
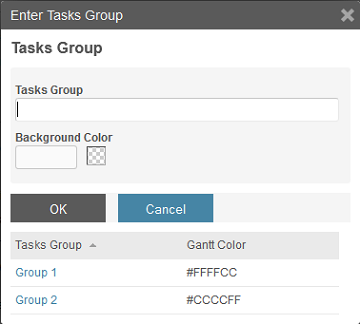
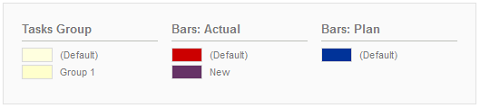
Tasks can be put into categories with tasks groups. Each tasks group can be assigned an individual color for its display in the Gantt diagram. If you wish to change an existing tasks group, please click the corresponding link in the "Tasks group" table column. Save your changes.
Resource types
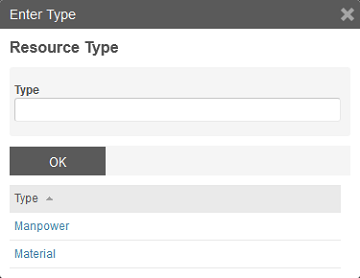
You will manage types of resources here by assigning categories to resources.
Priorities
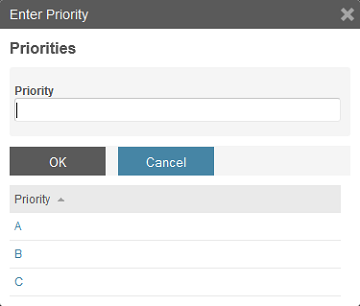
Define priorities for tasks here.
Status
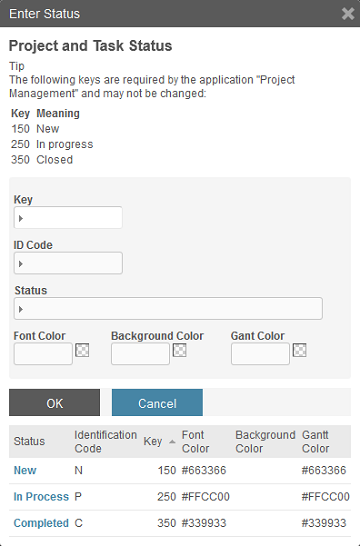
Statuses defined here will manage the progress of tasks and/or the progress made on the entire project. The keys for the three statuses "New", "In progress", and "Completed" cannot be changed. However, it is possible to add additional status steps to the list. When entering a new status, please take note of the following status ranges in order to assign it a rank that makes sense:
- New
Key 150 (validity range 125-174) - In progress
Key 250 (validity range 225-274) - Completed
Key 350 (validity range 325-374) - Open
Status less than 275 - Completed
Greater than/equal to 325
Customers
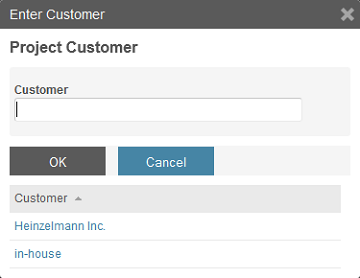
Projects can be assigned to customers entered here. For internal projects, use the customer "Internal".
Percentages
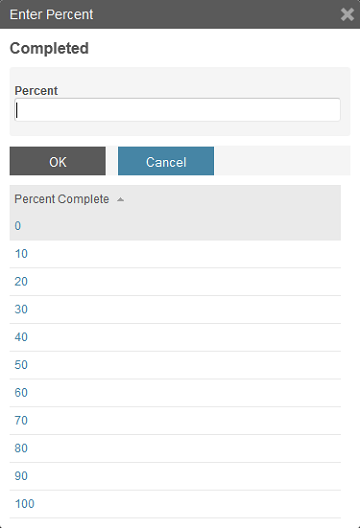
The assignment of a resource to a project will be set here as a percentage.
Units of cost

Define the units of cost for the use of resources on tasks here.
Expense types
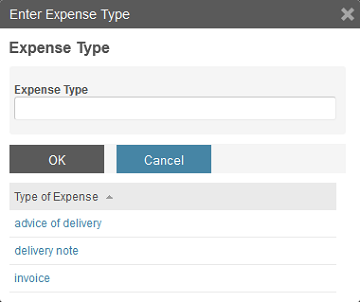
Types of receipts for recorded receipts will be managed here.
General settings tab
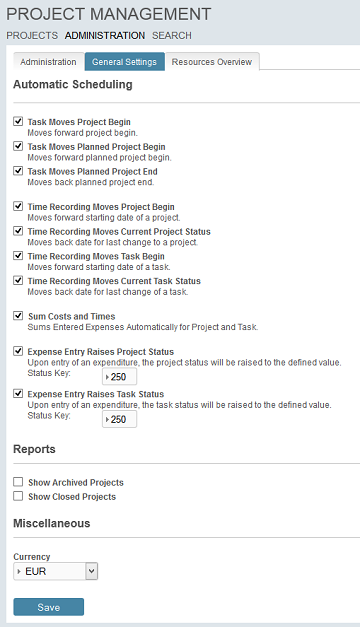
Automatic settings
The "Automatic settings" area will allow you to define whether the starting and/or ending date of newly created or changed tasks and time recordings will affect the beginning or end of a project.Task moves project begin
Tasks whose starting date lie before the beginning of the project will move the project begin date to the start date of the task with this setting.Task moves planned project begin
Tasks whose starting date lie before the starting date of the project will move the planned project begin to the start date of the task with this setting.Task moves planned project end
Tasks whose ending date lie after the project end will move the planned project end to the ending date of the task with this setting.Time recording moves project begin
Time recordings whose starting dates lie before the starting date of the project will move the project start date to the start date of the time recording with this setting.Time recording moves current project status
Time recordings whose ending dates lie after the date of the last change to the project will move the date for the last change to the project to the ending date of the time recording with this setting.Time recording moves task begin
Time recordings whose starting dates lie before the starting date of a task will move the start date of the task to the start date of the time recording with this setting.Time recording moves current task status
Time recordings whose ending dates lie after the date of the last change to a task will move the date of the last change of a task to the end date of the time recording with this setting.Sum costs and time
Adds together recorded expenditures for projects and tasks.Expense entry raises project status
When entering expenditures, the project status will be raised to the defined value. The standard value is "250", which corresponds to a status of "In progress". When entering an expense, the status of the project will automatically be set to "In progress".Expense entry raises task status
When entering expenditures, the task status will be raised to the defined value. The standard value is "250", which corresponds to a status of "In progress". When entering an expense, the status of the project will automatically be set to "In progress".Reports
Show archived projects
This setting will cause archived projects to be included in all reports.Show closed projects
This setting will cause completed projects to be included in all reports.Miscellaneous
The currency for recording costs in projects will be defined here. Select the desired currency from the drop-down list. By clicking OK, all settings will be saved.Resources overview tab
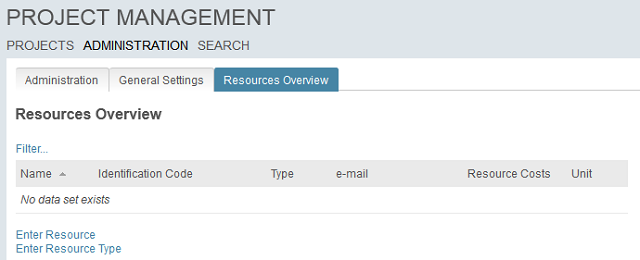
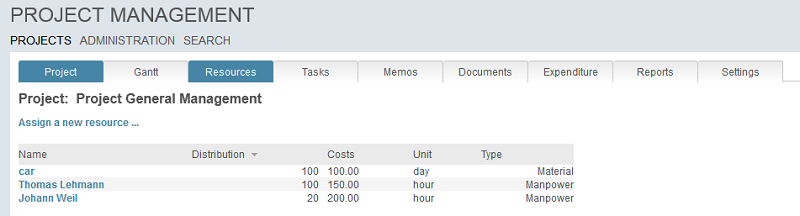
All project resources will be managed on this tab. Via "Enter resource type", a new type of resource can be entered. Clicking the "Filter" link allows you to filter the table by types of resources. A new resource will be entered by clicking "Enter resource".
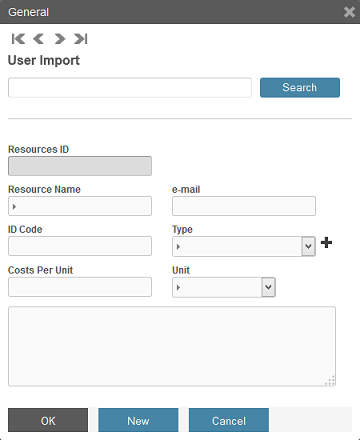
In the "User import" field, you can search for users that have been entered in the "User Manager" for the portal. If you leave all fields blank here and click "Search", the complete list of all users will be shown, from which you can select a user. The fields "ResourceID", "Resourcename", "ID", and "Email" will be populated automatically. Define the type of resource via the drop-down list "Type". Click the
Create project
If a member of the management is logged onto the portal, a project of the management can be created. On the start page, you will see the portlet "Projects MNG".
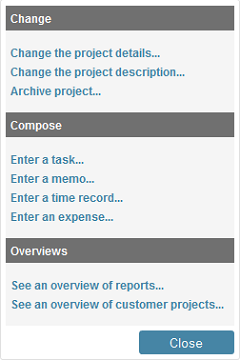
Here, click on the link "I want to...".
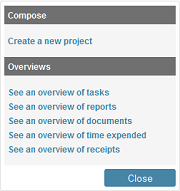
Select the menu item "Create a new project" here.
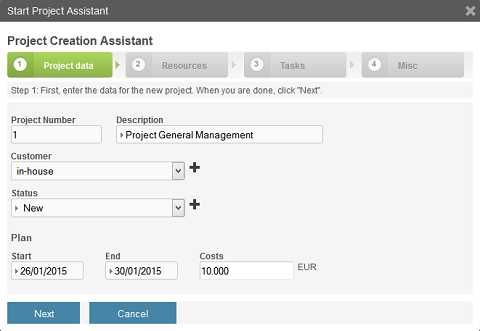
Enter a "Project number" and the "Title" of the project here. In the "Customer" drop-down list, select the customer relating to the project. For internal projects, please use the entry "Internal". The "Status" of a new project will automatically be entered as "New". Enter the planned starting and ending date of the project and its planned "Costs". When you are finished, click "Next".
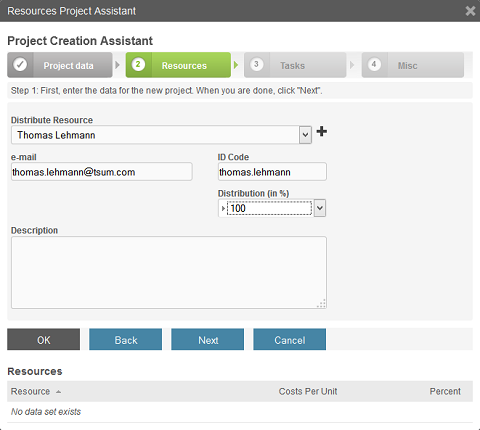
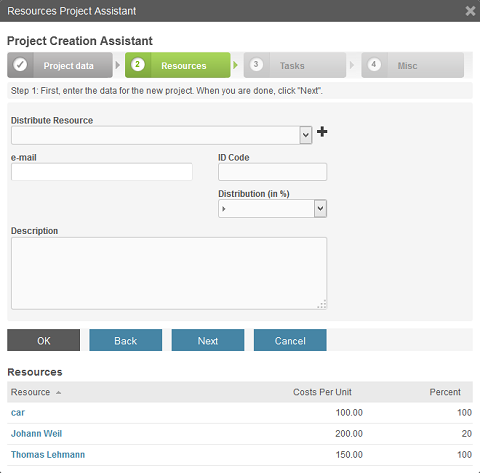
Select a resource that will be used for the project. The fields "Email", "ID", and "Description" will be automatically filled with data from the administration. Select the "Assignment (in %)" to define the percent of the resource that will be assigned to the project. Next, click "OK". The resource will now be shown in the table below the edit fields. As long as you do not click "Next", you can assign additional resources.
Then click "Next".
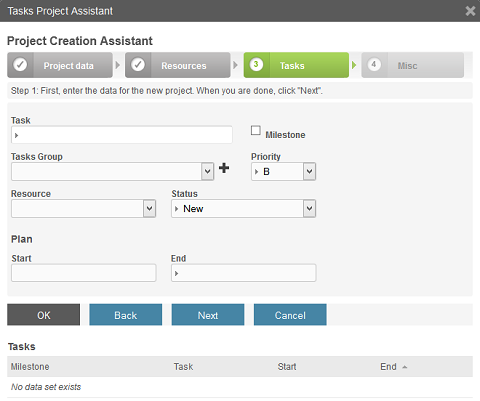
Here you can enter multiple tasks as long as you save the task with "OK and "do not click "Next". Enter a short description of the task in the "Task" field. With tasks that are marked as "Milestones", no starting date will be entered.
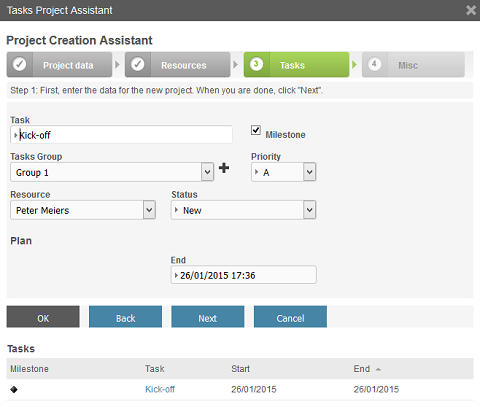
Next, select the "Tasks group" from the drop-down list. In the "Priority" drop-down list, you can select the priority of the task. Assign a "Resource" to it. When entering a new task, the status will automatically be entered as "New". Enter a "Start" and "End" date for the task.
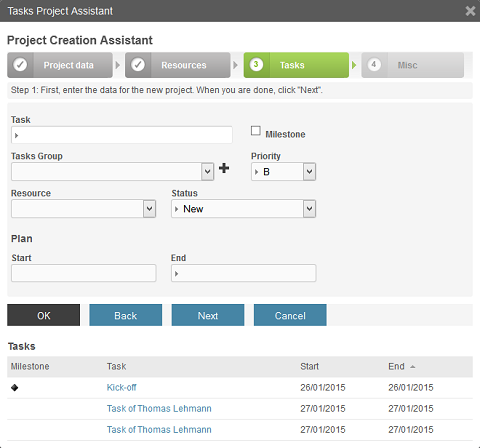
Save and then click on "Next".
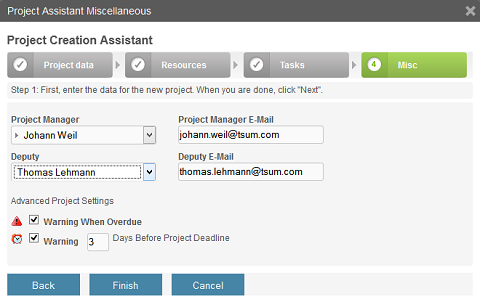
Assign a project manager and a substitute. With the setting "Warning when overdue", the project will be shown on the start page and the view page of project details with a
 icon if the end date passes without being completed. The setting "Warning ... days before project deadline" will label the project with the
  symbol on the home page and Project details view page. Click on "Finish" to complete creating the new project, this will then be shown in the "MNG" portlet.
Project details
Project tab
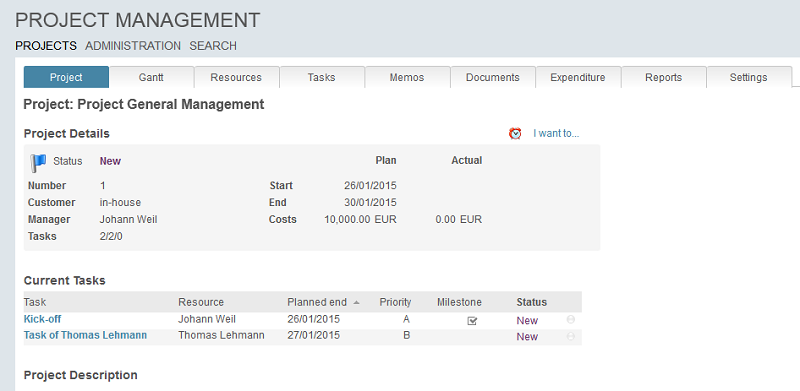
On this tab, you will see all details for the project. The planned starting and ending date and all costs are shown in the "Plan" column. All costs accrued in the progress of the project, that have been entered via receipts or time recordings, will be collated in the "Actual" column.
The "Tasks" line (in the example, "2/2/0") will inform you of the
- Sum of all tasks
- Number of open tasks
- Number of overdue tasks
The "Archive the project" menu item allows completed projects to be sent to the archives by clicking "Archive". Archived projects are available on the start page via the "Archive" tab. They can be reactivated at any time.
Gantt tab
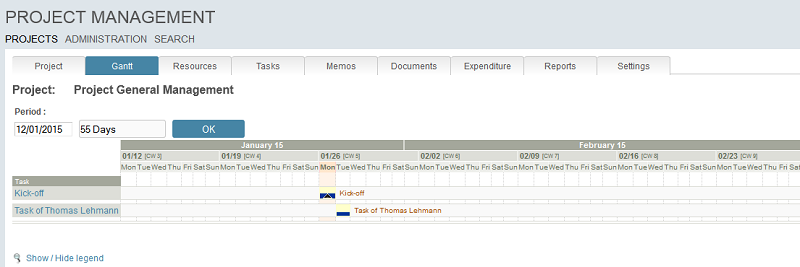
On this tab, all project tasks will be displayed graphically. The current day will be accentuated in color. If the mouse cursor is placed over a task, its details will be shown as a quicktip. If you enter a date in the "Timeframe" field, the chart will show the number of days from this date that you enter in the second field. The blue bar in the upper area of a task will display the planned length of the task. The bar underneath it will show the tasks group to which the task belongs. For tasks that are in progress, the bar for the actual status of the task will be shown. Clicking the link "Show / Hide legend" will show or hide the legend, respectively.
Resources tab
On this page, all resources will be shown.
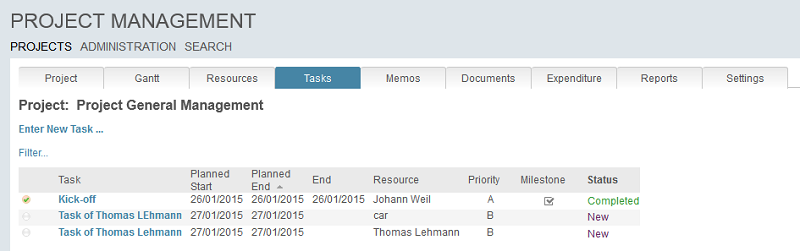
Tasks tab
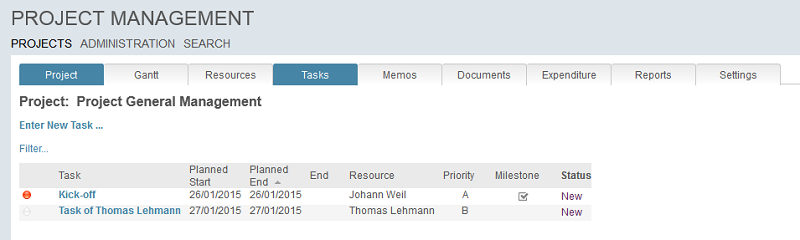
On this page, all project tasks will be shown.
Memos tab
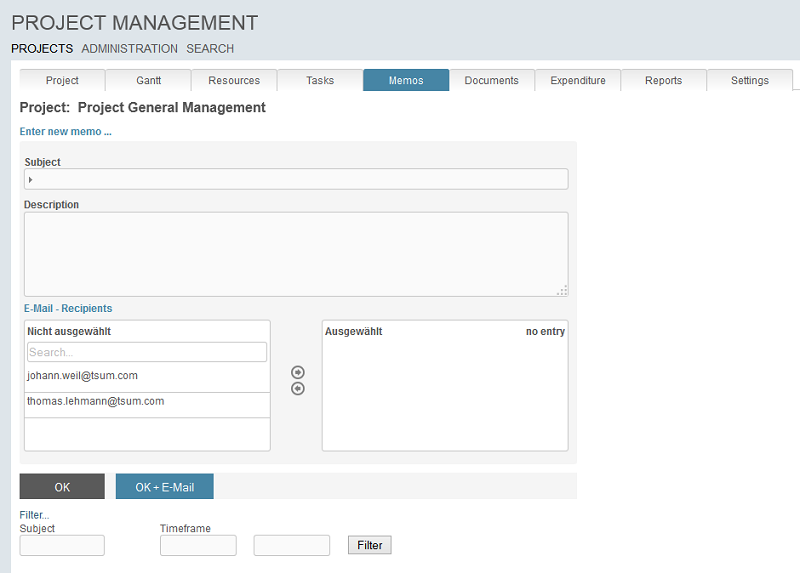
On this page, project memos can be entered. Clicking the "Enter new memo" link will show the entry fields. If you click on the "Email recipients" link, you can send the note to the email addresses that you move to the "Selected" list with the help of the arrow buttons.
Documents tab

On this page, documents can be saved. To do this, click the link "Add a new document". This will show the edit fields "Name" and "Document". A document inserted in this way will be shown in the table below.
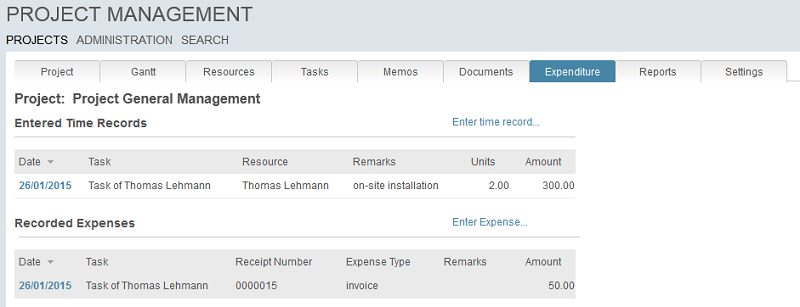
Expenditure tab
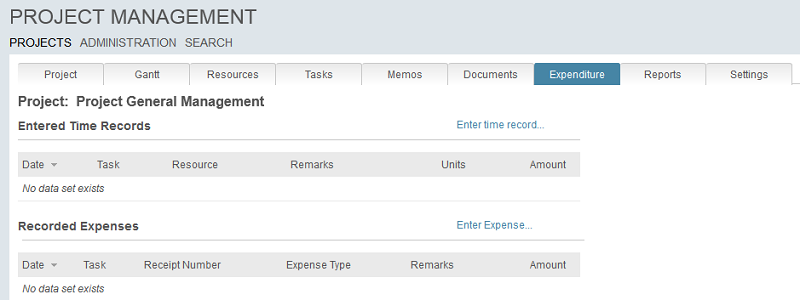
On this page, each recorded time expenditure and all entered receipts will be shown.
Reports tab
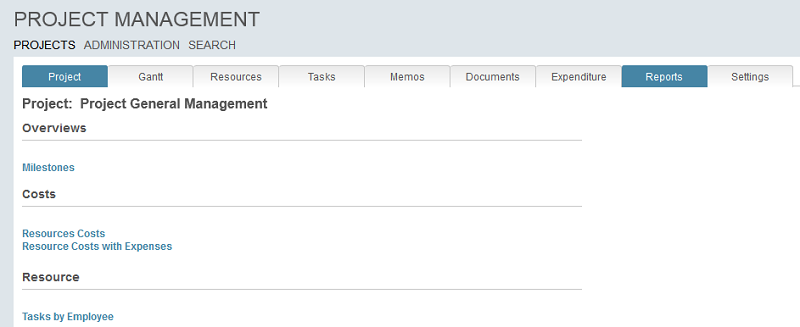
This page will show information about the entire project status and existing costs.
Settings tab
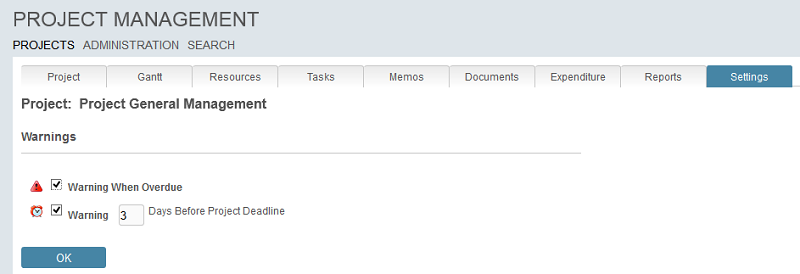
On this page, the general settings for the project will be set.
Portlets
Portlet GF
If a member of the management is logged in to the portal, the new project will now be shown on the start page.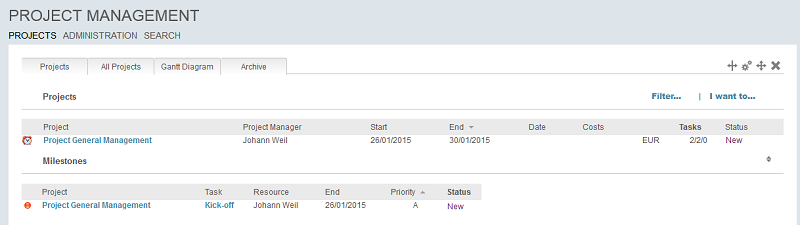
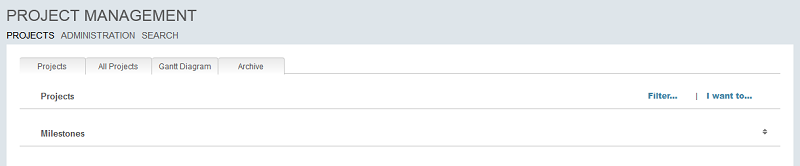
In the "Projects" table, the most important project details for projects of the management will be shown. The link "Filter" will show the projects of a specific customer or project manager. In the "Milestones" table, all tasks will be shown that are designated as milestones. The tab "All projects" allows the details of individual projects to be reached. The "Gantt diagram" tab will graphically display the project progress. All archived projects are available via the "Archive" tab.
Portlet PM
If a project manager is logged in to the portal, the start page will look something like the image below.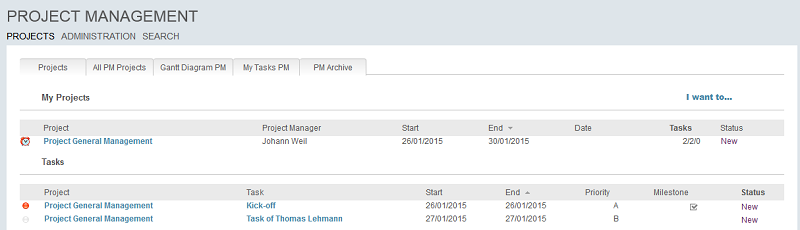
Project managers can only view the projects for which they have been entered as project manager or assistant. All project tasks will be listed in the "Tasks" area.
Portlet ST
If a project staff member is logged in to the portal, the start page will be shown as below: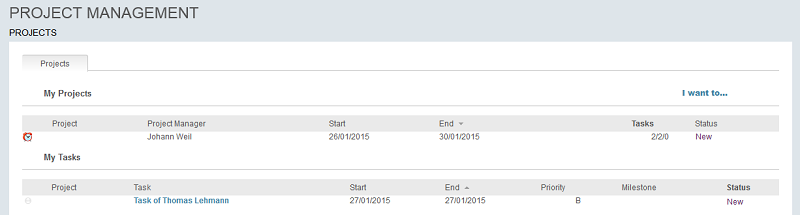
The project details cannot be changed. The lower area will show the tasks for the employee. Employees cannot create new projects. Additionally, overviews are restricted and only return data that the employee has entered himself. The project name will not be shown. In the default setting for Project Management, the project link will be set here as a button. Clicking this button will open the "Projects" page. As project staff have no permissions for this page, the button will be hidden. You can show the project name by replacing the button in the "Applications" module on the page "stProjectsCenter ST" in the "Projects" data group with a view field that is connected to the "Title" data field. The button to the page "stProjectsCenter" in the data group "Tasks" must also be replaced with a view field if you wish for the project name to be shown in the table below. In this case, the project title will also no longer be shown in link format for the "Project Manager" user group.
Tasks
Project tasks can be entered in the project details via the link "I want to…".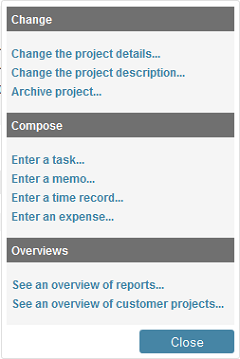
Select the menu item "Enter a task" here.
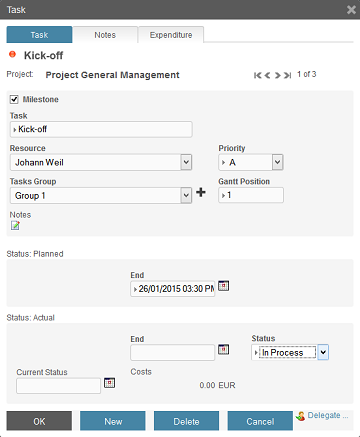
Enter a task
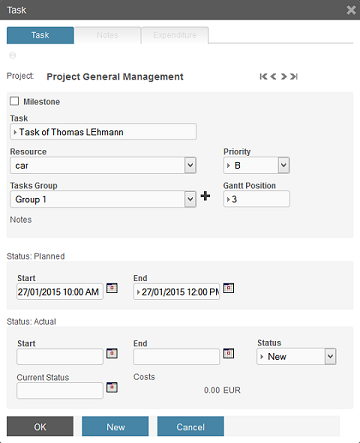
The "Milestone" setting identifies a task as a milestone. Enter the name of the task in the "Task" edit field. Select the Resource from the drop-down list. The task can be assigned to a "Tasks group". Select the priority of the task from the drop-down list. In the "Gantt position" field, the position of the task in the Gantt diagram can be defined. The lower the value of the integer entered, the higher the position of the task in the Gantt diagram will take. Enter the planned "Start" and "End" date of the task in the "Status: Planned" area. The "Actual" status of a task will automatically be entered as soon as the task is activated.
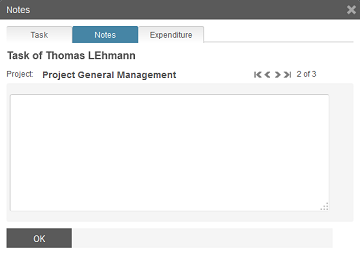
On the "Notes" tab, a description for the task can be recorded.
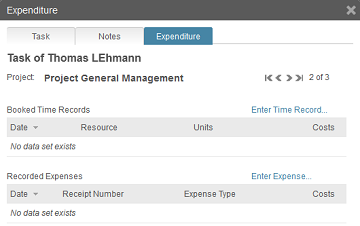
On the "Expenditure" tab, every recorded time expenditure and recorded receipts will be shown in the corresponding tables.
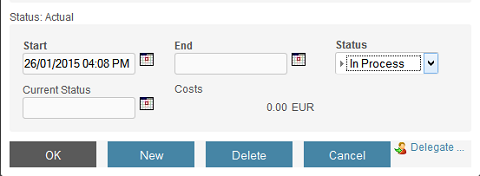
Change a task's status
Project managers have the access permissions necessary to change the status of tasks.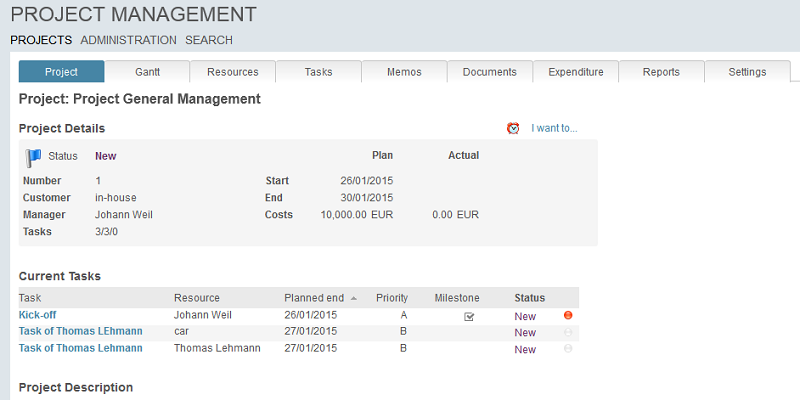
Newly entered tasks will be shown in the lower area of the project details. Clicking on the link to the task will open the task in a pop-up window.
The status of the task can be set to "In process" here.

The changed status will be shown in the project details. If the status of a task is set to "Completed", the task will no longer be shown on the "Projects" page. Completed tasks are available from the "Tasks" tab.
Delegate task
A task can be transferred to a different employee by clicking the "Delegate" link.
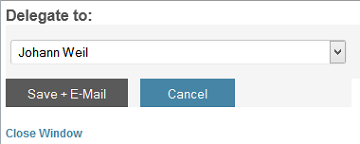
By clicking "Save + email", a notification will be sent via email to the employee to whom the task has been delegated. A prerequisite for this is that you have entered the email address in resources administration and that the E-Mail Service tool has been set up.
Time record
Time record portlet
IIn the Time record portlet on the portal page, the time expenditure for a task can be quickly and easily entered.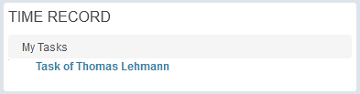
Click on the
 icon here, if you wish to begin a time recording.
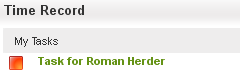
The
 icon shows that the time recording for a task is currently active. If you wish to stop the recording, please click the icon again.
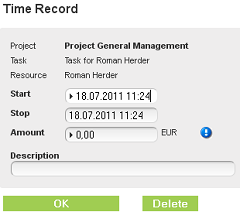
The start and end of the recording will be shown in a pop-up window. Additionally, based on the data that you have entered in the resources administration, it will calculate the costs of the recorded time. In the "Booking text" field, a description of the time recording can be entered. Save the recorded time expenditure by clicking on "OK".
Manual time recording
Click on "Record time expenditure", which you will find in the project details and on the Expense tab, a time expenditure can be manually recorded. You can also enter a time expenditure via the link "I want to…" on the start page of Project Management.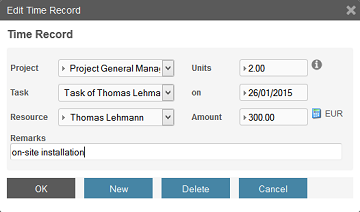
In the "Task" drop-down list, the task can be selected for which the time expenditure will be recorded. Enter the number of consumed units in the "Units" edit field. Click on
 "Information" to show additional information about the unit. The calculator icon
  allows the costs, using the data from the "Units" edit field, to be automatically calculated and entered.
Record expenses
By clicking "Record expense", which you will find in the project details and on the "Expenditure" tab in the task data, a record expense can be entered. Records can also be entered on the start page of Project Management by clicking the link "I want to…".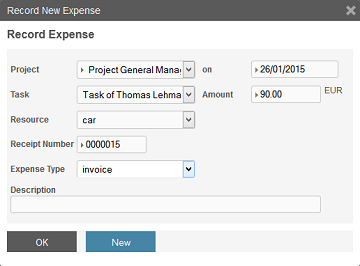
Enter the "Resource", "Receipt number", "Expense type", "Amount", and the "Description" here. Save the record expense by clicking "OK". After saving, this record expense will be shown on the "Expenditure" page in the table below.
Reports
Comprehensive project reports
On the start page of Project Management, members of the management and project managers can reach comprehensive analyses of projects from the menu item "I want to…" / "See an overview of reports".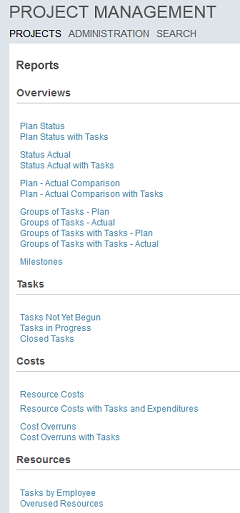
Plan Status
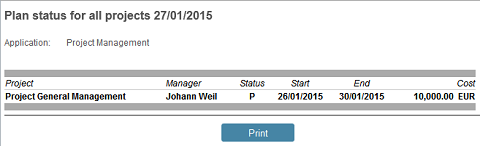
This report shows the planned status of all projects.
Plan status with tasks
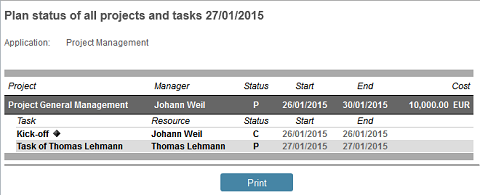
In addition to the planned status of the project, a listing of all tasks will be given here.
Actual status
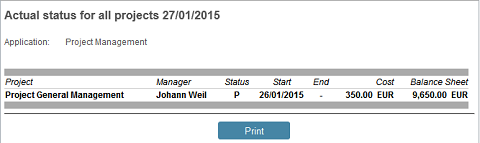
Here the status, start, end, current costs, and the balance of the actual status will be reported.
Actual status with tasks
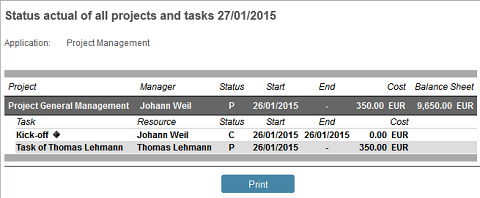
As well as an overview of the actual status, all tasks will be listed here.
Plan - Actual comparison

In this report, the planned status of all projects will be compared to the actual status and given as the balance.
Plan - Actual comparison with tasks
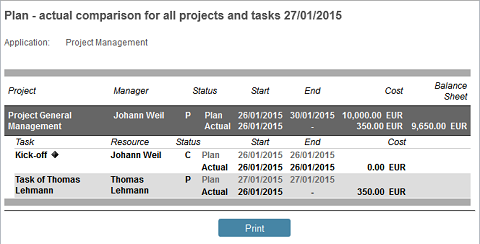
All tasks will be listed here in addition to the Plan – Actual comparison.
Task groups - Planned
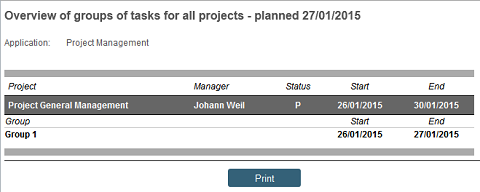
n this report, the planned start and end dates of task group tasks will be given.
Task groups - Actual
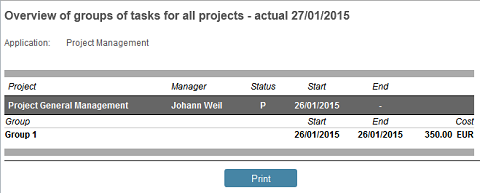
In this report, the actual start and end dates of task group tasks will be given.
Task groups with tasks- Planned
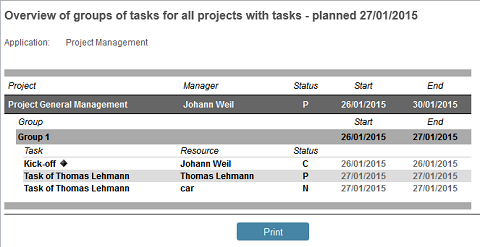
In addition to an overview of grouped tasks, all relevant tasks will be listed (Plan status).
Task groups with tasks- Actual
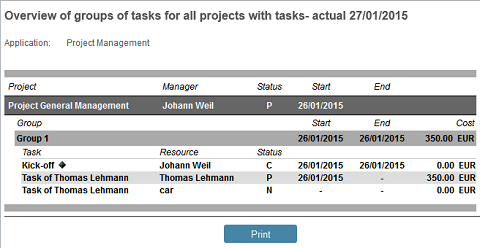
In addition to an overview of grouped tasks, all relevant tasks will be listed (Actual status).
Milestones
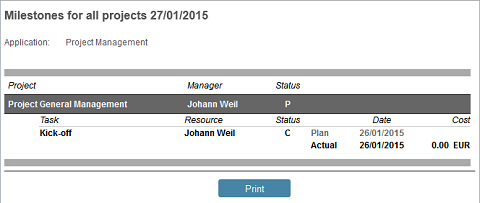
This report lists the milestones for all projects.
Tasks not yet begun
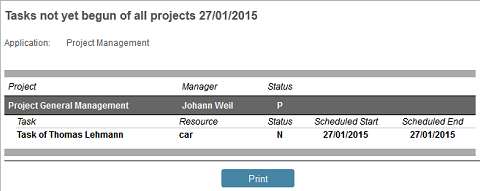
Here you will have an overview of all tasks that have not yet been started.
Tasks in progress
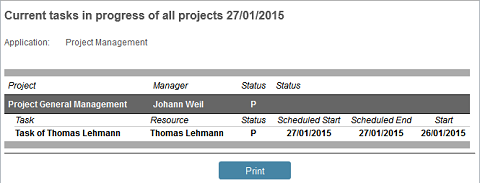
Here you will have an overview of all tasks with the status "In progress".
Closed tasks
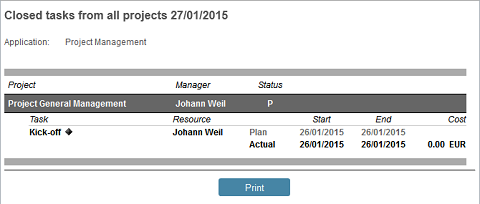
Here you will have an overview of all completed tasks.
Resource costs
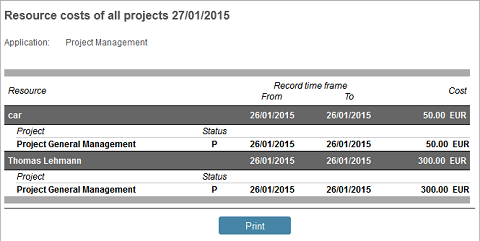
This report gives the costs of all recorded time expenditures and expenses.
Resource costs with tasks
Additionally to the costs, all tasks will be listed here as well.
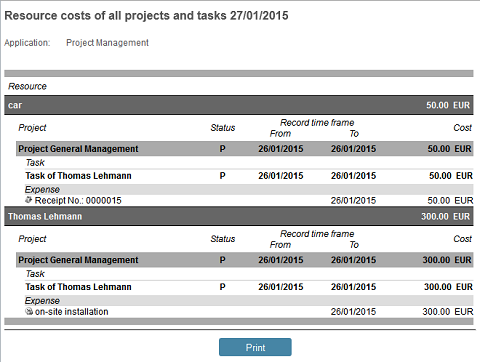
Resource costs with tasks and expenditures
With this report, you will see an overview of all costs, tasks, and expenditures of individual projects.
Cost overruns
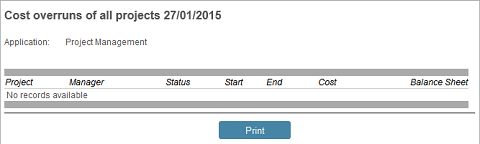
This report will inform the user of the balance when costs exceed the planned budget.
Cost overruns with tasks
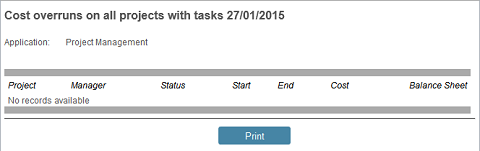
In addition to a report of cost overruns, all tasks will be listed here.
Tasks by employee
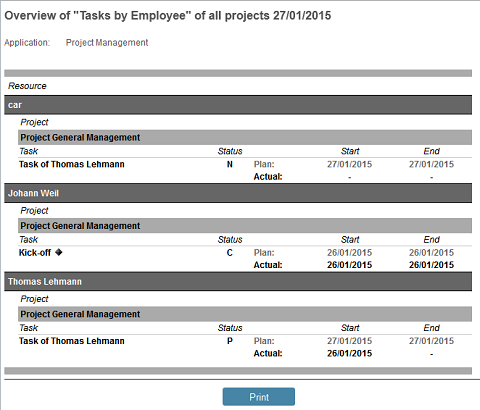
This report informs the user of task delegation in regard to individual users.
Overused resources
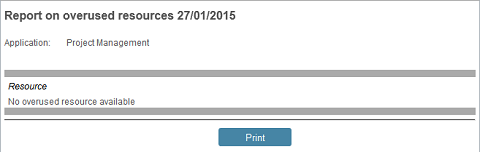
With this report, you can be made aware of overused resources. In it, the distribution of the resource to the individual projects, in connection with the tasks, will be considered. An overuse will occur when a resource has more than one task in the same time frame to process, and has a workload of over 100% between the tasks.
Project-related reports
The project-related reports are available via the "Reports" tab on the project details page.Milestones
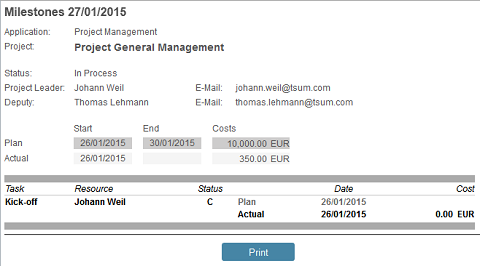
In this report, in addition to status and plan- and actual status, all milestones of the project will be analyzed.
Resource costs
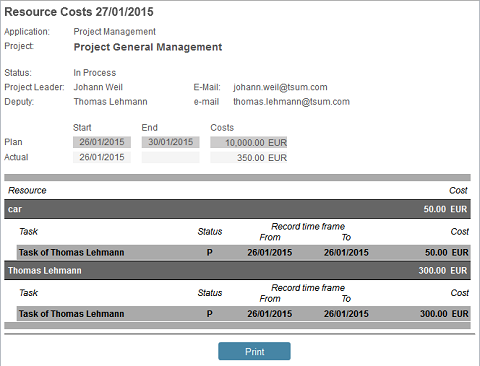
This report will inform you of the existing project costs. It will refer to recorded time expenditures and all receipts per task.
Resource costs with expenditures
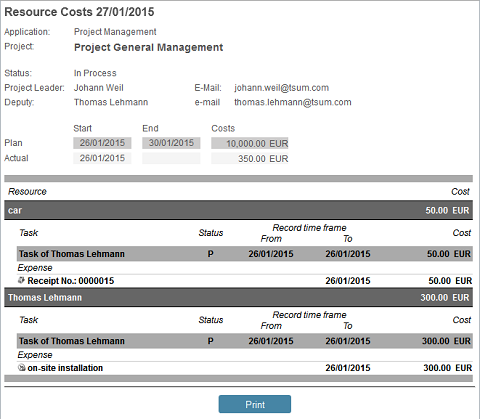
Additionally, information about the details of the expenditures will be given here.
Tasks by employee
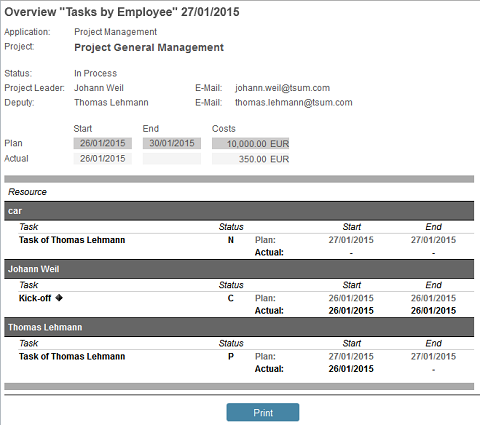
This report will inform you of the task distribution to the individual resources of the project.