Provide data - OData settings
Integration module Provide data OData / Context menu - Settings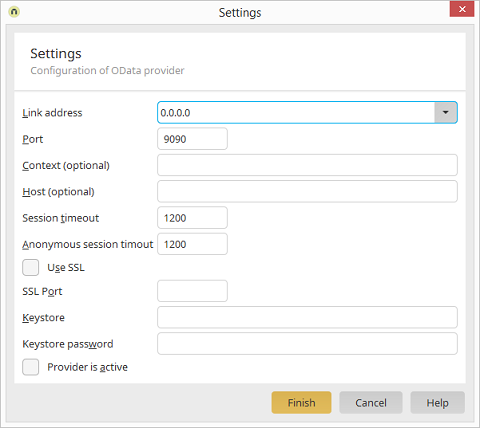
Connection address
The connection address defines who is allowed to access the OData service. If localhost is selected, the service can only be reached from the local computer. You may also select all (IPv4), all (IPv6), or manually enter a specific IP address. Select localhost if you only want to test your OData service locally.Port
The port defines the TCP port at which the OData service can be reached. Ideally, you should use a port number between 49152 and 65535, one of the so-called private ports. These can be used variably, since they are not registered and do not belong to a specific application. Host and port together constitute the endpoint URL, at which your service will be reachable. The service can also simply integrated into your domain for public use.| Please make sure that you do not use the same port as is used by the portal server, and that the port is not already in use by any other application. |
Context
You may specify a context here, which will be used as part of the service endpoint URL. This may be useful to run services behind a reverse proxy. The context name must conform to URL standards. The endpoint URL will be constructed as follows when a context is specified:http://hostname:port/context/service.svc.
Host
A host name can be specified optionally here, when the host name of the public service URL is different from the host name of the server. This may be useful to run services behind a reverse proxy.Use SSL
This option allows SSL encryption to be activated.Keystore
A keystore is required for SSL connections, which stores the certificates. Specify the file name of the keystore here. The keystore file must be located in the portal directory \internal\cfg\odata\producer.Keystore password
Specify the password for the keystore here.Provider is active
Activates or deactivates the OData Provider. The Provider is deactivated in the default configuration. After activation, the services are started automatically.SSL configuration
If Use SSL has been activated in the server settings, access to the OData services is only possible via the HTTPS protocol. To enable SSL, the server requires an X.509 certificate that is stored along with a certificate from the Certificate Authority in a keystore. In order to test SSL, it is possible to create what is known as a "self-signed" certificate. For productive use, a certificate should be used from a public certification authority, as otherwise warnings will appear in the browser and OData clients will decline the SSL connection. The following section describes how to generate a self-signed certificate for testing purposes and store it in a keystore. You can find additional information on this topic, including how to import trustworthy certificates, here.Creating a keystore with SSL certificate
Open the command prompt in Windows or a shell in Linux, then switch to the bin directory of your Java JDK installation (such as \jre\windows\amd64\bin). Then run the following command:$ keytool -keystore /path/to/keystore.ks -alias odata -genkey -keyalg RSA
Enter keystore password: password
What is your first and last name?
[Unknown]: odata.intrexx.com
What is the name of your organizational unit?
[Unknown]: OData
What is the name of your organization?
[Unknown]: United Planet GmbH
What is the name of your City or Locality?
[Unknown]:
What is the name of your State or Province?
[Unknown]:
What is the two-letter country code for this unit?
[Unknown]:
Is CN=odata.intrexx.com, OU=OData, O=United Planet GmbH,
L=Unknown, ST=Unknown, C=Unknown correct?
[no]: yes
Enter key password for <odata>
Authentication methods
Authentication and permissions
To provide secure access to the data in a portal via OData services, user authentication takes place using the portal server login methods. The following section describes what kinds of authentication methods are supported and how they are configured. This can be done either by defining a global method for all services or by defining a specific method for each service. The Intrexx data group permissions for a user are checked by the Intrexx Portal Server for OData requests, just like in the portal. If a user does not possess sufficient rights to read or change data records, the OData service will either reply with an empty results set or with a permissions error.Intrexx authentication
With Intrexx authentication, login is accomplished by using a user name and password, where the password is transferred in encrypted format using a challenge key provided by the server. This is the recommended method to use an Intrexx portal to access an OData service on another Intrexx portal.Plain Text authentication
Plain text authentication corresponds to the HTTP basic authentication method. This can be used to log in to the service directly from the browser. However, the password will be transferred in unencrypted format, meaning that this method should only be implemented when SSL encryption is active at the same time.Combined Intrexx and Plain Text authentication
Normally, OData services use a combination of Intrexx and plain text authentication. First, an attempt is made to log on the client using Intrexx authentication. If this fails, a plain text authentication is performed. If this also leads to an error, the client request is refused.Windows Integrated Authentication
With Windows Integrated Authentication, the users are detected via the Active Directory / LDAP and logged on using the Kerberos protocol. This allows single sign-on to be realized in Windows environments. This method is only available with Microsoft Windows Servers and a domain environment. As soon as Windows Integrated Authentication is activated for a portal, OData users must log on with their Windows user name (domain\user) and password to an OData service. To authenticate OData requests directly with the logged on Windows user and thereby avoid an additional login, further steps are required.First, a third-party library is required that is added to the lib directory of the Intrexx Portal Server. To do this, copy the file waffle-jna-1.6-with-dependencies.jar from the \adapter\odata\kerberos directory, which is a child directory of the Intrexx installation directory, to the \lib child directory. Restart the portal service afterwards. Next, the login method for the OData server must be changed to Integrated Authentication. To do this, open the file \internal\cfg\om.cfg, located in the portal directory, in a text editor. Within it, look for the line that starts with:
<binding scope="odataservice" auth-type="IntegratedAuthClient"/>
<binding scope="odataservice" auth-type="IntegratedAuth"/>
Trusted authentication
When using trusted authentication, a user can be logged on simply via the user's GUID. In doing so, it will be expected that the HTTP request sends the user GUID as the user name. This is the least secure method and should only be implemented in trusted environments.Configuring the authentication methods
The global or service-specific authentication method is defined in the file om.cfg. By default, Intrexx defines the IntrexxAuth method for all OData services. To use another method or to overwrite the method for a specific service, open the \internal\cfg\om.cfg file in the portal directory with a text editor.<?xml version="1.0" encoding="UTF-8"?>
<configuration>
<authentication anonymous="05CE8CE3035924F7D3088895F1D87DADD65CFAE4">
<binding scope="web" auth-type="IntrexxAuth"/>
<binding scope="client" auth-type="IntrexxAuth"/>
…
<binding scope="odataservice" auth-type="ODataAuth"/>
…
</authentication>
</configuration>
- ODataAuth
- IntrexxAuth
- PlainTextAuth
- IntegratedAuth
- IntegratedAuthClient
- TrustedAuth
<binding scope="odataservice:MyService" auth-type="PlainTextAuth"/>